# Image Tracking
# Introduction
These example shows how to recognize one or multiple images in the viewfinder and overlay them with augmentations.
For a better understanding, here are some terms that will be used in the following and other sections of this documentation related to augmented reality.
Target: A target image and its associated extracted data that is used by the tracker to recognize an image.
Target collection: An archive storing a collection of targets that can be recognized by the tracker. A target collection can come from two different resource types
- Plain: A regular ZIP file containing images in plain JPG or PNG format
- Pre-processed: Regular images that are converted into a WTC file (Wikitude Target collection) for faster processing and storing more images offline.
ImageTracker: The tracker analyzes the live camera image and detects the targets stored in its associated target collection. Multiple trackers can be created, however only one tracker can be active for tracking at any given time.
ImageTrackable: The trackable configures which targets from the collection should be recognized and manages the lifetime and position of
DrawablesDrawable: An instance of an augmentation prefab that is instantiated in the scene when a target is detected.
How to create Image Targets
Make sure to read the chapter on how to create Image Targets before using Image Recognition on your own.
# Simple Image Recognition in Unity
The Wikitude Unity SDK is based on a couple of important scripts, two of which are the WikitudeSDK and the ImageTracker scripts.
# WikitudeSDK
The WikitudeSDK script handles the initialization and destruction of the SDK and its native components. It additionally needs to be configured with the correct license key for your application. You can either buy a commercial license from our webpage or download a free trial license key and play around with our SDK in Unity.
# ImageTracker
To add an image tracker to the scene, simply create a new GameObject and add the ImageTracker script to it.
An ImageTracker itself needs a Wikitude Target Collection (.wtc or .zip file) which contains information needed to detect those reference images. Target collections can be generated and downloaded from the Wikitude Studio - a free web-based tool, that you can access with your developer account. You can also generate them right inside Unity with the Target Collection Editor. Place the .wtc or .zip file into the special StreamingAssets folder, so that the Wikitude SDK can load them at runtime. To specify which .wtc or .zip file should be used, select the ImageTracker game object in the scene. Please make sure that the Target Source is set to Target Collection Resource and using the dropdown next to Target Collection you can choose the desired one.
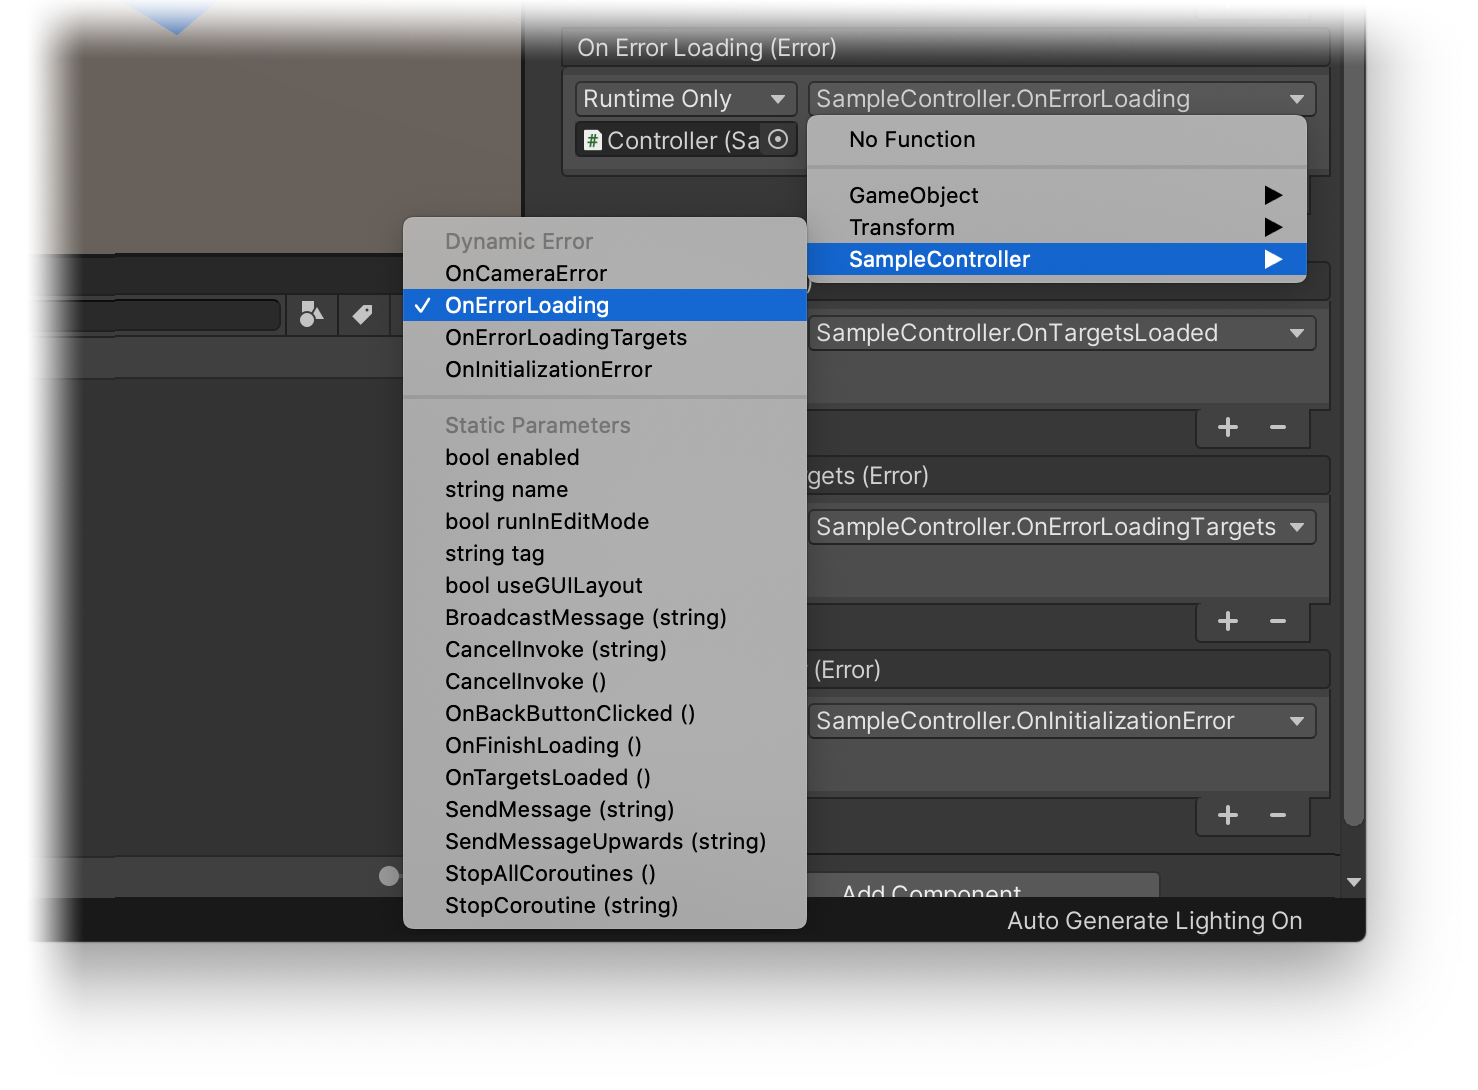
To react on events like successfully loading a collection file, you can use the Unity Events listed in in the inspector of the ImageTracker. These events are split into two groups. The first group contains events triggered by the TargetCollectionResource when the collection file was loaded or if there was an error. The second group includes events triggered by the ImageTracker itself if it was successfully initialized with the desired collection file or not. On the desired event, click the plus sign to add a new subscriber, drag the GameObject that should receive the event over the None (Object) field and select the function you want to be called from the No Function dropdown.
When subscribing to events that have a single basic parameter type, make sure to select your function from the top list marked with Dynamic, rather than the static version from the bottom. This ensures that the parameters are passed correctly from the Wikitude plugin and are not overwritten by Unity.
For more information on working with Unity Events, please check the Unity Manual and Events Tutorial.
# Define custom augmentations
Custom augmentations are defined by assigning a Prefab with the desired content to the Drawable field in the ImageTrackable inspector. A trackable defines which targets from your collection you want to be tracked and what prefab should be instantiated as an augmentation. This Drawable prefab will be instantiated at runtime at the appropriate location when an associated target is recognized, and will be destroyed when its target is lost.
If the tracker is using a .wtc or .zip file located in the StreamingAssets folder, the ImageTrackable inspector will show a list of all the targets in that collection file. By toggling the checkbox next to the target's name, you can select which targets will be tracked by this trackable, or you can choose Select All at the top of the targets list to include them all.
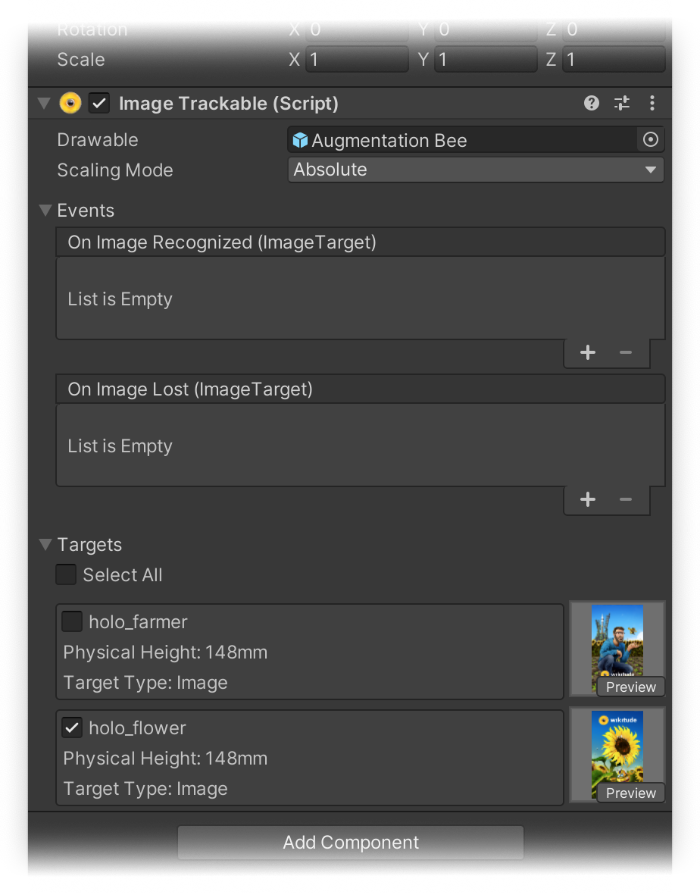
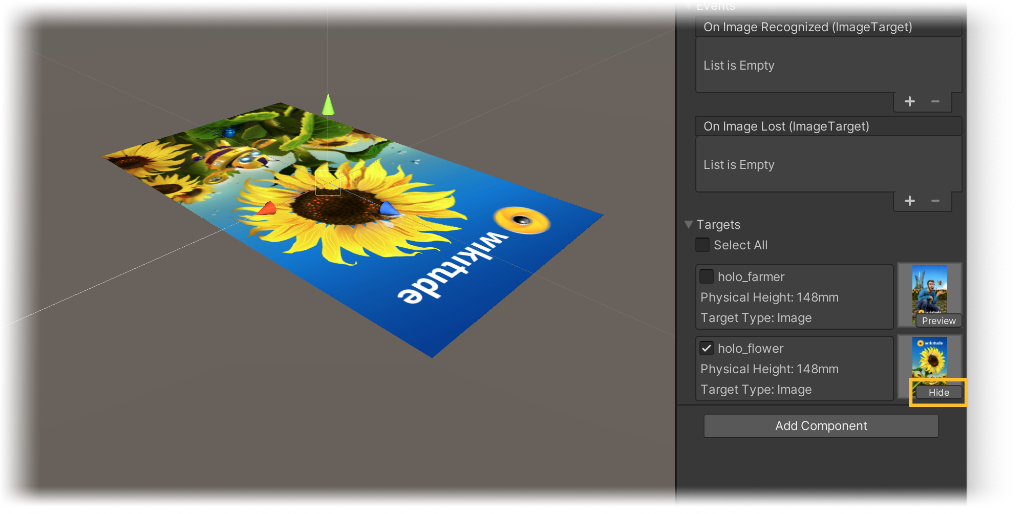
By pressing the Preview button, the target will be displayed in the Unity Editor's Scene view, providing a convenient way to place your augmentation relative to the target.
If the target collection file is located somewhere else, for example if you are downloading it at runtime, or when using CloudRecognitionService instead, you can still select which targets will be included by entering the target name into the TargetPattern text field. Possible values are full target image names (e.g. pageOne, pageTwo) or wildcards (page*). You can use * if you want to include all targets.
WARNING
If the .wtc or .zip file you are using is not located in the StreamingAssets folder, kindly make sure that the targetName used with the ImageTrackable component corresponds to one of the target names in your target collection. You can also use wildcards to match any target or only a specific subset of targets.
To handle visibility manually, you can subscribe to the OnImageRecognized and OnImageLost events on the trackable. This can be useful when you want to show different augmentations based on which target was tracked or if you want the augmentation to persist even after the target is no longer visible, if AR Bridge is used. The string parameter of these events will indicate which target was tracked or lost.
# Using videos as drawables
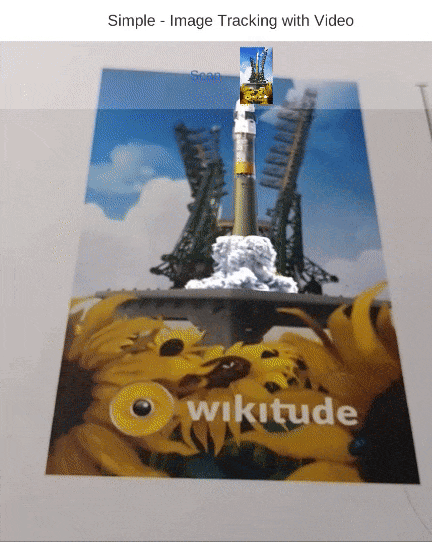
Through Unity's Video Player component, it is possible to assign a video file to a prefab, which can then be played when the Drawable is instantiated. As shown in the Simple - Image Tracking with Video sample scene in the Unity Expert Edition samples, this can even include videos with transparent background. The Unity-supported file formats for videos with per-pixel transparency currently are .mov with the Apple ProRes 4444 codec on Mac as well as .webm with the VP8 codec on all Editor platforms, according to the Unity documentation (opens new window).
TIP
In our sample scene, we assigned a transparent 1x1 px texture to the video plane. This is necessary, since this texture is what is shown before the the video starts playing - if no texture were assigned, the plane would be white (as a placeholder) instead of transparent for a short amount of time when first recognizing the target.
# Multiple Targets
An image tracker can track multiple targets at the same time. This can be configured in the ImageTracker inspector, by setting the Concurrent Targets to a value larger than 1. However, keep in mind that if you don't plan to use multiple targets, it is best to leave the value at 1 for optimal performance.
To define augmentations for multiple targets, you will need to set a prefab to the Drawable field in the ImageTrackable inspector. At runtime, when a new target is recognized the Drawable prefab will be instantiated and placed in the scene as a child of the Trackable and when the target is lost, it will be destroyed. When multiple targets are being tracked, their corresponding Drawables are positioned in the game world to match what the camera sees. This also means that you can infer the relative positions between targets directly in the game world.
This behaviour was designed to allow easy setup for simple use cases, but if you may need more control over the lifetime of the augmentations. If that is the case, you can leave the Drawable field empty in the ImageTrackable inspector and add callbacks to the OnImageRecognized and OnImageLost events. When OnImageRecognized is called, the ImageTarget that is passed as a parameter will contain a Drawable GameObject property. This empty GameObject behaves the same way as the Drawable described above and you should use it as a parent for your augmentations, to make sure they are positioned properly.
public void OnImageRecognized(ImageTarget recognizedTarget) {
    // Create the custom augmentation.
    // You can use recognizedTarget.Name and recognizedTarget.ID
    // if you need custom augmentations for each target and instance.
    GameObject newAugmentation = GameObject.CreatePrimitive(PrimitiveType.Sphere);

    // Set the newAugmentation to be a child of the Drawable.
    newAugmentation.transform.parent = recognizedTarget.Drawable.transform;

    // Position the augmentation relative to the Drawable by using the localPosition.
    newAugmentation.transform.localPosition = Vector3.zero;
}
Keep in mind that the Drawable is still destroyed when the target is lost, so if you still have the augmentations attached to it, they will be destroyed as well. The OnImageLost event is called before the Drawable is destroyed, so you can use that event to move the augmentations somewhere else if they need to persist after the target was lost.
In case the same target is detected multiple times simultaneously, the ID property in the ImageTarget parameter will help you distinguish between them.
# Multiple Targets Extended
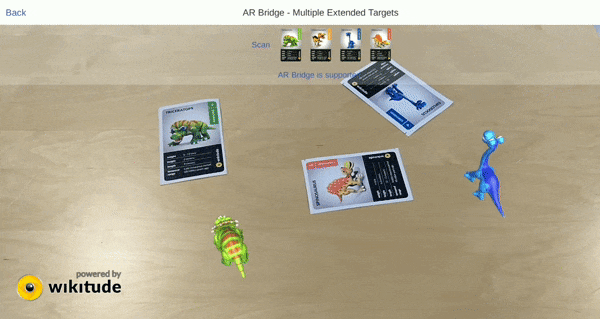
The AR Bridge - Multiple Extended Targets sample illustrates extended functionality in regards to tracking an image and displaying an augmentation: In this sample, the augmentation’s position in world space is no longer locked to the ImageTarget’s. Instead, it is able to move independently. The ImageTarget merely initializes its respective augmentation - one out of four dinosaurs, in this case - and informs it of the ImageTarget's current position in world coordinates.
When the distance between the augmentation and the target becomes bigger than a few centimeters, the dinosaur will start walking towards it. If there are multiple targets in the scene that correspond to one of the dinosaurs, this dinosaur will always run towards the most recently recognized ImageTarget. Should that target be lost, the dinosaur will start walking to the second most recent target. Even when no targets are visible anymore, the augmentation is maintained.
# Runtime Tracker
Image trackers can be created at runtime with no restrictions on the location of the target collection used. To do this, simply create a new GameObject and add the ImageTracker component to it, select TargetCollectionResource as the TargetSourceType and create a new TargetCollectionResource object. If you are using a collection located in the StreamingAssets folder, the TargetPath property should be the path relative to the StreamingAssets folder and UseCustomUrl property should be false.
If you want to use a collection located elsewhere on the device or on the web, the TargetPath property should be set to the absolute path to the target, prefixed by the protocol file://, http:// or https:// as appropriate. The UseCustomUrl in this case should be set to true. An ImageTracker can not only load a target collection but also images with the extension .jpg, .jpeg and .png.
Trackables can also be created at runtime, but make sure to add them as a child of the tracker before the Start() method is called on the parent tracker, otherwise they won't get registered in time.
GameObject trackerObject = new GameObject("ImageTracker");
ImageTracker imageTracker = trackerObject.AddComponent<ImageTracker>();

imageTracker.TargetSourceType = TargetSourceType.TargetCollectionResource;
imageTracker.TargetCollectionResource = new TargetCollectionResource();
imageTracker.TargetCollectionResource.UseCustomURL = true;
imageTracker.TargetCollectionResource.TargetPath = "https://url.to.your/collection.wtc";

GameObject trackableObject = GameObject.Instantiate(TrackablePrefab);
trackableObject.transform.SetParent(imageTracker.transform, false);
Creating trackers at runtime is also possible when using the CloudRecognitionService instead of a TargetCollectionResource.
# Runtime Tracker Sample
The Unity package comes with a dedicated sample scene called Simple - Runtime Tracker to showcase runtime creation of trackers and augmentations.
# Creating Trackers and augmentations during runtime
The address bar in the sample scene takes the path to a supported target collection (.wtc, .zip or .wto), a supported image file (with the extension .jpg, .jpeg or .png) or a custom JSON file, which has entries to set up a tracker and its augmentation.
{
    "targetCollection": "https://url.to.your/collection.wtc",
    "assetBundleAndroid": "https://url.to.your/assetbundle-android",
    "assetBundleIOS": "https://url.to.your/assetbundle-ios",
    "targetThumbnails" : [
        "https://url.to.your/thumbnail_target1.png",
        "https://url.to.your/thumbnail_target2.png"
    ]
}
If the input in the address bar is NOT a path to a JSON file, the tracker will directly be created depending on its extension. The creation of the Tracker itself is handled in a similar fashion as described in the section above.
    private void CreateTracker(string address, GameObject drawable) {
        switch (Path.GetExtension(address).ToLower()) {
            case ".png":
            case ".jpeg":
            case ".jpg":
                _enableTargetInstructionsOnLoad = true;
                StartCoroutine(LoadThumbnail(address));
                CreateImageTracker(address, drawable);
                break;
            case ".zip":
            case ".wtc":
                CreateImageTracker(address, drawable);
                break;
            case ".wto":
                CreateObjectTracker(address, drawable);
                break;
            case ".json":
                StartCoroutine(CreateTrackerWithConfig(address));
                break;
            default:
                Debug.LogError("Input address is not valid and has to either end with .zip, .wtc, .wto or .json!");
                DisplayToast("Input address is not valid!");
                break;
        }
    }
If the input in the address bar is a path to a custom JSON file, the file is first loaded and deserialized to a SampleTrackerAddresses object, which holds all the paths needed for setup, and then the platform-specific AssetBundle will be downloaded. If the download was successful, the Tracker is being instantiated with a custom drawable and the thumbnails are also loaded to be displayed like in the other sample scenes.
    private IEnumerator LoadAssetBundle(SampleTrackerAddresses addresses) {
        string drawableAddress = Application.platform == RuntimePlatform.Android ? addresses.assetBundleAndroid : addresses.assetBundleIOS;

        UnityWebRequest request = UnityWebRequestAssetBundle.GetAssetBundle(drawableAddress);
        yield return request.SendWebRequest();

        if (request.error != null) {
            ...
        } else {
            AssetBundle bundle = DownloadHandlerAssetBundle.GetContent(request);
            GameObject drawable = DefaultDrawable;
            foreach (string assetName in bundle.GetAllAssetNames()) {
                if (Path.GetExtension(assetName) ==  ".prefab") {
                    drawable = bundle.LoadAsset(assetName) as GameObject;
                    DisplayToast("Custom Prefab loaded!");
                    break;
                }
            }
            foreach (string thumbnailAddress in addresses.targetThumbnails) {
                _enableTargetInstructionsOnLoad = true;
                StartCoroutine(LoadThumbnail(thumbnailAddress));
            }

            string targetCollectionAddress = addresses.targetCollection;

            string[] allowedExtensions = {".png", ".jpg", ".jpeg", ".zip", "wtc", ".wto"};
            if (Array.IndexOf(allowedExtensions, Path.GetExtension(targetCollectionAddress).ToLower()) > -1) {
                CreateTracker(targetCollectionAddress, drawable);
            } else {
                ...
            }
            bundle.Unload(false);
        }
    }
# Exporting AssetBundles
A custom tool included in the Unity package helps with exporting AssetBundles for Android and iOS. Please refer to the official Unity documentation for more information about AssetBundles (opens new window). In a nutshell, AssetBundles are platform-specific, non-code archives consisting of assets like textures, videos, sound files, 3D files and Prefabs. Since the Tracker accepts a Prefab as a drawable, as described in the section above, there should be exactly one Prefab asset in the folder that will be selected for bundling. The Prefab itself might consist of multiple assets, which should also be located in the same folder. Use the AssetBundle helper tool available in the Window dropdown menu under Wikitude > AssetBundles Export Helper to create an AssetBundle for iOS and one for Android.
![]()
# Multiple Trackers
You can have multiple trackers in the same scene, each tracking its own collection at the same time. Please keep in mind that each additional tracker incurs a small performance penalty, so please don't use more than are actually needed.
# Range Extension
The Wikitude SDK Image Recognition engine can make use of HD camera frames to detect images from further away. Further away in this context means distances 3x further away, compared to not enabling this mode (e.g. A4-sized target can reach recognition distances in the area of 2.4 meters/ 8 feet). This feature is called Image Recognition Range Extension and can be activated through a setting in the ImageTracker class. The setting RangeExtension is optional and accepts the following three constants
ONOFFAUTO(default)
see ImageRecognitionRangeExtension for details
Processing an HD camera frame in the pipe-line is computationally more expensive - this means that this feature is only activated if the phone can handle this additional effort without sacrificing user experience. The AUTO setting will determine that based on available CPU power and camera access (e.g. Camera2 API for Android) and is the default setting in the SDK.