# Instant Tracking
# Introduction
Instant Tracking is an algorithm that, contrary to those previously introduced in the Wikitude SDK, does not aim to recognize a predefined target and start the tracking procedure thereafter, but immediately start tracking in an arbitrary environment. This enables very specific use cases to be implemented.
The algorithm works in two distinct states; the first of which is the initialization state. In this state the user is required to define the origin of the tracking procedure by simply pointing the device and thereby aligning an indicator. Once the alignment is found to be satisfactory by the user (which the users needs to actively confirm), a transition to the tracking state is performed. In this state, the environment is being tracked, which allows for augmentations to be placed within the scene.
The instant tracking algorithm requires another input value to be provided in the initialization state. Specifically, the height of the tracking device above ground is required in order to accurately adjust the scale of augmentations within the scene. To this end, the example features a range input element that allows the height to be set in meters.
During the initialization, another parameter can be set which influences the alignment of the instant tracking ground plane. This ground plane is represented by the initialization indicator and can be rotated in order to start instant tracking at e.g. a wall instead of the floor.
# Basic Instant Tracking
The Instant Tracking example provides a simple implementation of an application that allows users to place augmentations in their environment.
# Scene Setup
The scene consists mainly of the following parts:
Canvas: the root of the UI we will be using in this sample. Since Instant Tracking works in two distinct phases, the UI is also split in two, allowing to completely switch the interface. When the Instant Tracker is in Initializing mode, the UI only displays a slider to control the height, as explained previously and a button to switch to Tracking mode. After the switch is done, the slider will hide and the ground plane will attach to the surface tracked by the SDK. Also, five buttons are placed at the bottom of the UI for placing objects within the scene.Wikitude SDK: component that holds the main SDK script and acts as a container for the trackers. As in the other samples, it provides the license key setting, main camera assignation, and toggling ofAR Bridgeand logging options.Instant Tracker: allows setting the tracking efficiency mode, plane orientation, and handles events relevant to instant tracking.Instant Trackable: defines the drawable that will represent the tracked surface, and handles events from both the initialization and tracking phases.Plane Trackable: defines the plane detection configuration, and handles events related to plane recognition.Device Camera: defines the resolution and framerate of the camera, and handles camera related events.
Controller: container for custom script components.InstantTrackingController: coordinates the activity between the Instant Tracker, the UI, the augmentations and the touch input.
![]()
# Instant Tracking Controller
When in tracking mode, pressing on the corresponding buttons will place augmentations on a plane within the scene.
public void OnAugmentationButtonPressed (int modelIndex) {
    if (_isTracking) {
        /* If we're tracking, instantiate a new model prefab based on the button index and */
        GameObject modelPrefab = Models[modelIndex];
        Transform model = Instantiate(modelPrefab).transform;
        _activeModels.Add(model.gameObject);
        /* Set model position at touch position */
        var cameraRay = Camera.main.ScreenPointToRay(Input.mousePosition);
        Plane p = new Plane(_modelParent.transform.up, _modelParent.transform.position);

        float enter;
        if (p.Raycast(cameraRay, out enter)) {
            model.position = cameraRay.GetPoint(enter);
            model.parent = _modelParent.transform;
        }

        /* Set model orientation to face toward the camera */
        Quaternion modelRotation = Quaternion.LookRotation(Vector3.ProjectOnPlane(-_modelParent.transform.forward, _modelParent.transform.up), _modelParent.transform.up);
        model.rotation = modelRotation;

        /* Assign the new model to the move controller, so that it can be further dragged after it leaves the button area. */
        if (_moveController != null) {
            _moveController.SetMoveObject(model);
        }
    }
}
Once the surface we are tracking comes within the field of view of the camera and is recognized, we should activate the augmentations in the scene.
public void OnSceneRecognized(InstantTarget target) {
    InstantTarget = target.Drawable;

    /* realign augmentation parent according to the instant target */
    _modelParent.transform.parent = InstantTarget.transform;
    _modelParent.transform.localPosition = Vector3.zero;
    _modelParent.transform.localRotation = Quaternion.identity;

    Transform placementNotification = InstantTarget.GetComponentsInChildren<Transform>(true).Single(t => t.name == "Placement Notification");
    if (placementNotification) {
        placementNotification.gameObject.SetActive(true);
    }

    SetSceneActive(true);
}
When the tracker loses the scene, which can happen when moving the device too fast, we make sure that all the models and the plane drawable are hidden. Because the camera is not moved anymore when tracking is lost, the augmentations would appear to be frozen on the screen if they were not hidden.
public void OnSceneLost(InstantTarget target) {
    _modelParent.transform.parent = null;

    InstantTarget = null;

    SetSceneActive(false);
}
# Plane Detection
Using plane detection, the Wikitude SDK will search for planar surfaces in the representation of the scene (the point cloud). Sufficient and accurate information will then produce planar surfaces, that developers can use to interact with the actual scene. Hit testing will use found planes for a better estimate of depth values in the scene. The algorithm can detect different types of planes
- Horizontal Up (e.g. floor, carpet, table)
- Horizontal Down (e.g. ceiling)
- Vertical (e.g. wall)
- Arbitrary (e.g. ramp, staircase)
Developers can choose which type of planes they are interested in and filter correspondingly.
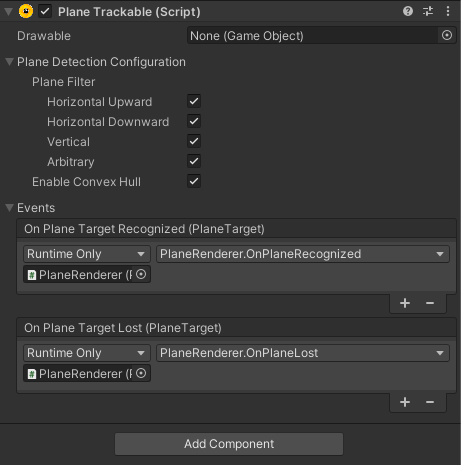
In order for the plane detection to work, a GameObject with the Place Trackable script has to be added to the Instant Tracker. It defines the plane detection configuration, and handles events related to plane recognition:

When configuring Plane Detection, the plane trackable offers two more options:
Plane Filter: This option allows you to select which type of plane should be detected, and which ones should be ignored. The type of a recognized plane can be found through the Wikitude.Plane.PlaneType property. Filtering out undesired planes types can improve performance as well, since fewer planes need to be processed.Convex Hull: This option enables the computation of the convex hull of a plane. The convex hull can be access through the Wikitude.Plane.ConvexHull property as a float[], where every two values represent the X and Z values of a point relative to the plane, which can be rendered as a triangle fan. If the convex hull is not needed, it's best to disable this option, to avoid unnecessary processing.
Here is an example of how to handle the plane callbacks. Please note that some error validation and mesh generation have been omitted from this example. Please see the full example code in the PlaneRenderer.cs script.
public void OnPlaneRecognized(PlaneTarget recognizedPlane) {
    /* Whenever a new plane is recognized, create a new GameObject to display it. */
    var renderPlane = new GameObject("Plane");
    renderPlane.transform.SetParent(recognizedPlane.Drawable.transform);
    renderPlane.transform.localPosition = Vector3.zero;
    renderPlane.transform.localRotation = Quaternion.identity;

    var mesh = new Mesh();
    renderPlane.AddComponent<MeshFilter>().mesh = mesh;
    renderPlane.AddComponent<MeshRenderer>().material = new Material(RenderPlaneMaterial);

    UpdateMesh(renderPlane, mesh, recognizedPlane);

    _renderPlanes.Add(recognizedPlane.ID, renderPlane);
    _trackedPlanes.Add(recognizedPlane);
}
public void OnPlaneLost(PlaneTarget lostPlane) {
    GameObject renderPlane;
    if (_renderPlanes.TryGetValue(lostPlane.ID, out var renderPlane)) {
        _renderPlanes.Remove(lostPlane.ID);
        Destroy(renderPlane);
    } else {
        Debug.LogError("Could not find lost plane with ID: " + lostPlane.TargetId);
    }

    _trackedPlanes.Remove(lostPlane);
}
# Scene Picking Controller
The OnScreenConversionComputed event attempts to match touch coordinates on the screen to an element in the internal point cloud generated during the initialization phase. If the boolean in this callback is true, the 3D coordinates received can be used to place an augmentation at that spot in the tracked plane, which can be assigned in the editor.
public void OnScreenConversionComputed(bool success, Vector2 screenCoordinate, Vector3 pointCloudCoordinate) {
    if (success) {
        /* The pointCloudCoordinate values are in the local space of the trackable's Drawable. */
        var newAugmentation = GameObject.Instantiate(Augmentation, _augmentationParent.transform) as GameObject;
        newAugmentation.transform.localPosition = pointCloudCoordinate;
        newAugmentation.transform.localScale = Vector3.one;
        _augmentations.Add(newAugmentation);
    } else {
        ToastStack.SetToastText(_screenConversionFailedToastID, $"No point found at the touched position: {screenCoordinate.x}, {screenCoordinate.y}.");
        ToastStack.ShowToast(_screenConversionFailedToastID);
    }
}
Once the surface we are tracking comes within the field of view of the camera and is recognized, we should activate the augmentations in the scene and realign their parent.
public void OnSceneRecognized(InstantTarget target) {
    _instantTarget = target.Drawable;
    Transform placementNotification = _instantTarget.GetComponentsInChildren<Transform>(true).Single(t => t.name == "Placement Notification");
    if (placementNotification) {
        placementNotification.gameObject.SetActive(true);
    }

    /* realign augmentation parent according to the instant target */
    _augmentationParent.transform.parent = _instantTarget.transform;
    _augmentationParent.transform.localPosition = Vector3.zero;
    _augmentationParent.transform.localRotation = Quaternion.identity;

    foreach(GameObject augmentation in _augmentations) {
        augmentation.SetActive(true);
    }
}
When the tracker loses the scene, which can happen when moving the device too fast, we make sure that all the models and the plane drawable are hidden. Because the camera is not moved anymore when tracking is lost, the augmentations would appear to be frozen on the screen if they were not hidden.
public void OnSceneLost(InstantTarget target) {
	_augmentationParent.transform.parent = null;
    _instantTarget = null;
    foreach(GameObject augmentation in _augmentations) {
        augmentation.SetActive(false);
    }
}
# Hit Testing
The Hit Testing example works in a similar way as the Plane Detection does except the detected planes won't be rendered. This is because the Instant Tracker parent is missing a GameObject with the Plane Trackable attached. The purpose of this example is to test collissions happening on the recognized plane surface. When clicking on the screen, an Augmentation will be created at the point where the touch position's 2D coordinates will match on the tracked surface.
# Persistent Instant Targets
The save and load instant targets feature extends the Basic Instant Tracking and allows for AR experiences to be persistently accessed by multiple users across devices and operating systems. Furthermore instant targets can be expanded on the fly. This section is concerned with showcasing this feature based on the corresponding samples of the sample application.
The Save Instant Target and Load Instant Target samples shows how to use this feature in Unity. In both examples it is possible to place, scale and move objects within the scene once the instant tracker is in the tracking mode.
# Scene Setup
The scenes are similar to the one described in the Instant Tracking example, except that the Controller GameObject has an additional SaveInstantTarget or LoadInstantTarget script respectively attached.
![]()
In addition, a save/load button is added to the canvas as well, triggering the corresponding method in the controller's SaveInstantTarget or LoadInstantTarget script, respectively.
# Save Instant Targets
To save an instant target, the InstantTracker.SaveCurrentInstantTracker method needs to be called with the path to a desired saving directory. The InstantTracker has to be in tracking mode and the directories of the provided path also needs to exist.
private void SaveTarget() {
    var path = Application.persistentDataPath + "/InstantTarget.wto";
    Tracker.SaveCurrentInstantTarget(path);
    InfoMessage.text = "Saving instant target to: " + path;
}
# Load Instant Target
To load an instant target, the InstantTracker.LoadInstantTarget method needs to be called with the path to a previously saved instant target. Additionally, an expansion policy can be set through the InstantTargetRestorationConfiguration. This controls whether the instant target should be further expanded or not.
private void LoadTarget() {
    /* A TargetCollectionResource is needed to manage file loading. */
    var targetCollectionResource = new TargetCollectionResource();
    /* UseCustomURL is used to specify that the file is not inside the "StreamingAssets" folder */
    targetCollectionResource.UseCustomURL = true;
    /* The "file://" is used to indicate that the file is located on disk, and not on a server. */
    targetCollectionResource.TargetPath = "file://" + Application.persistentDataPath + "/InstantTarget.wto";
    var configuration = new InstantTargetRestorationConfiguration();
    /* Indicate that we allow the target to be expanded after it was loaded. */
    configuration.ExpansionPolicy = InstantTargetExpansionPolicy.Allow;
    Tracker.LoadInstantTarget(targetCollectionResource, configuration);
}
After the instant targets are loaded, the InstantTracker's state is changed to tracking mode automatically.
# Instant Tracking and AR Bridge
Using AR Bridge, the Wikitude SDK acts as an extention to the core ARKit's / ARCore'S features. In doing so, some of the examples behave slightly different.
In order to enable the AR Bridge, the AR Bridge Provider has to be set to Internal in the Wikitude SDK Component.
![]()
# Plane Detection
The user is not required to set the device's height above ground any more since the AR Bridge is already taking care of that.
# Save / Load Targets
This feature is not implemented yet and will be added in future releases