Studio Editor
Wikitude Studio Editor is an authoring tool used for creating augmented reality experiences. With useful features and an intuitive interface, it should help you accomplish these tasks without any particular technical skills. Studio Editor lets you add augmentations to your targets, as well as edit and remove them. Augmented projects can be exported for further use or shared for consumption.
User interface
The interface consists of the Header, the Project toolbar, the 3D view, and the properties panels.
Header

In the Header, you will find the logo, the project name, the target name, and the user menu. To navigate back to projects overview, click on the Studio Editor logo.
Project toolbar

The Project toolbar contains a back button, a side menu toggle, the project menu, and a grid toggle.
- Click the back button to navigate back to the target overview.
- The side-menu toggle button opens/closes a side-menu which displays all targets of your project. Click on the target of your choice, to quickly navigate between them and open them in the editor.
- The project menu contains the following menu items:
- Project - offers settings and various export options
- Insert - offers the creation of different augmentation types
- View - offers options related to the 3D view / panels
- Preview - opens the preview dialog
- Help - offers an about dialog or leads to this documentation
- The grid toggle button switches the visualization of the grid in the 3D view on or off
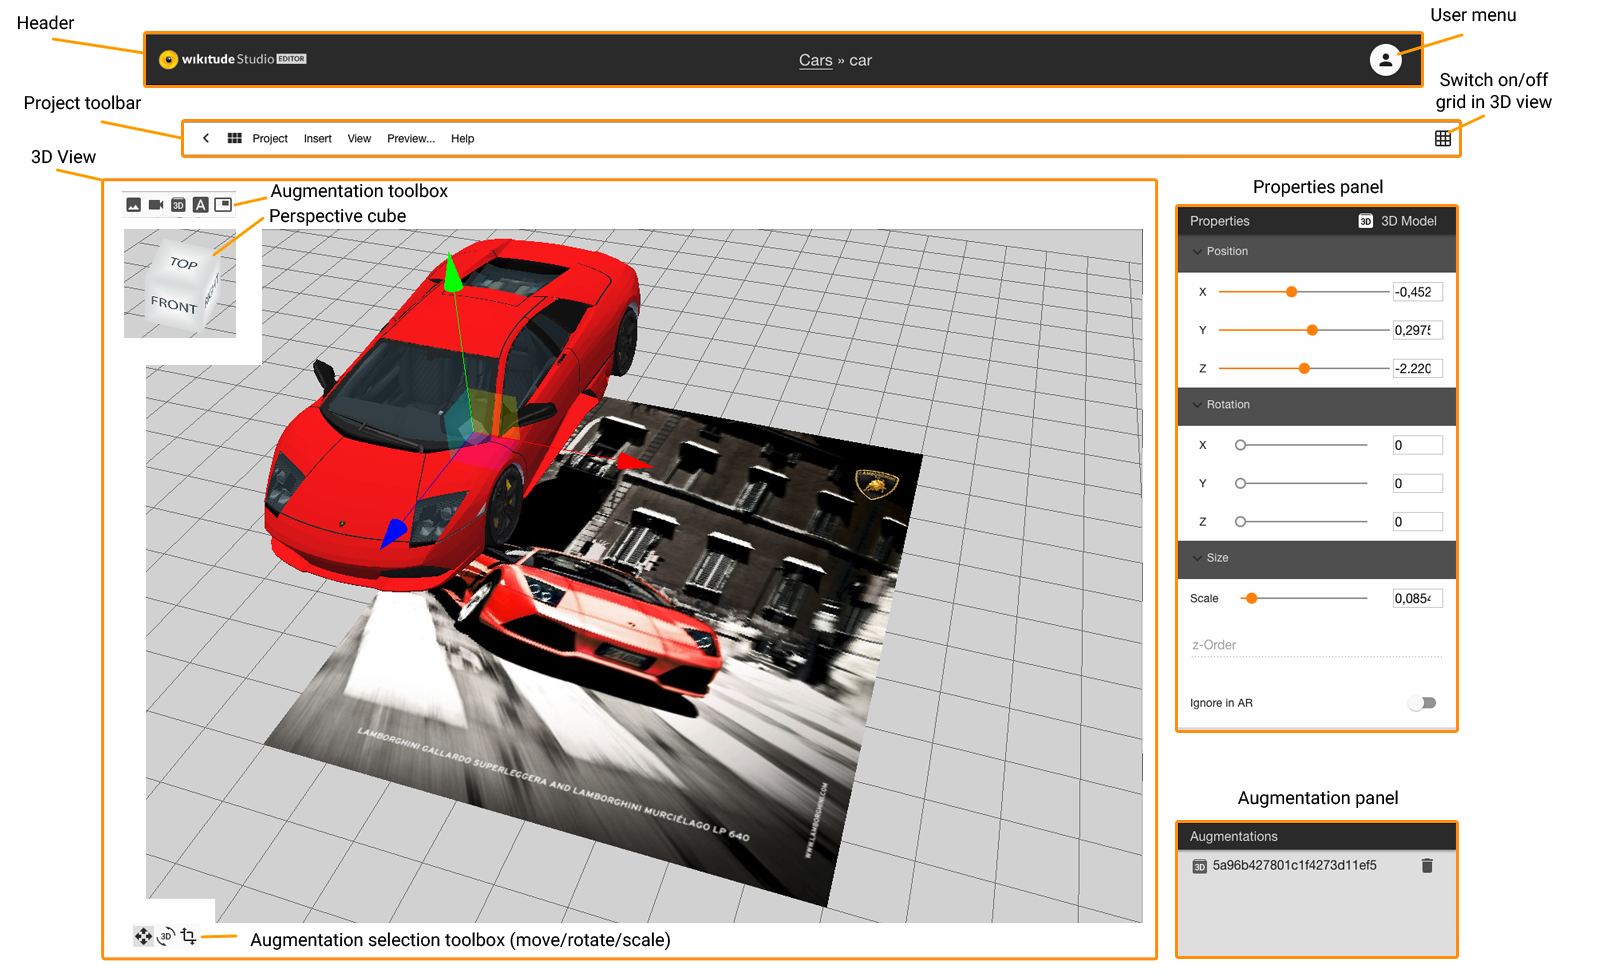
3D view
The 3D View contains apart from the 3D visualization, an augmentations toolbar, the perspective cube, and the augmentation selection toolbox.
- The 3D visualization displays the target image or the point cloud, depending on the target type. Created augmentations are visualized together with the target and can be positioned in this view.
- The augmentations toolbar offers a quick creation of various augmentation types. The same functionality can be found in the Insert menu.
- The perspective cube visualizes the current perspective on the target. Change the 3D view by clicking the sides or any corner of the cube.
- The augmentation selection toolbox changes the control type of a selected augmentation. The default type is move. There are three selection types:
- move (shortcut: W) to position the augmentation in the 3d space
- rotate (shortcut: E) to rotate the augmentation along all axis
- Scale: (shortcut: R) to scale the augmentation
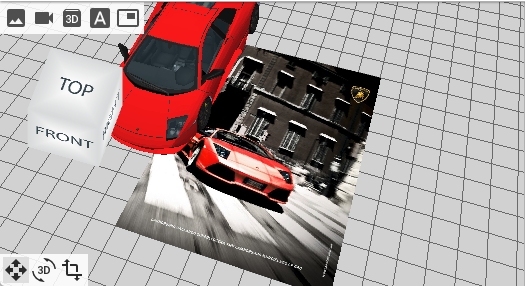
Properties panels
- The Properties panel displays all properties related to the selected augmentation. Most properties can be set/changed in this panel.
- The Scene panel displays all augmentations which exist to the current target. Click on an item in this list to select an augmentation. Click on the trash bin to delete the related augmentation. For object targets, you can see a point cloud item in the list view which enables you the edit mode for point cloud transformation. Furthermore, for object targets which are created after the 24th of June 2020, there is an 'image views' list item which visualizes the cameras in the 3D view.
Augmentations
Image
The image augmentation  is used to overlay images. Images can be uploaded directly from your computer.
Properties
Position: Sets the x/y/z-position of your augmentation. The center of the coordinate system is the center of your augmentation and the center of the target.
Rotation: Sets the rotation around the x/y/z-axis by a certain angle.
Scale: Sets the scale value of your augmentation.
Opacity: Sets the opacity of your augmentation. Setting the value to 0 makes the augmentation completely transparent, whereas 1 will render it opaque.
Ignore in AR: If this is switched on, the augmentation is not used in the project but displayed in the 3D view of the Wikitude Studio Editor only. This function can be used for augmentations which help to position other augmentations but should not be displayed in the final project.
Video
The video augmentation  allows you to display videos on top of your target. Videos in your AR project can be used in two different modes and from various sources.
Modes:
- Fullscreen videos played in the integrated player
- Overlay videos which play on top of the target
- Overlay videos with an alpha channel
Exception: External video links (e.g. youtube- or vimeo- links) are always opened in a browser window, independent from the setting.
Sources:
- Upload an mp4-video
- Enter an external path to a video
Properties
Position: Sets the x/y/z-position of your augmentation. The center of the coordinate system is the center of your image augmentation and the center of the target.
Rotation: Sets the rotation around the x/y/z-axis by a certain angle.
Scale: Sets the scale value of your augmentation.
Opacity: Sets the opacity of your augmentation. Setting the value to 0 makes the augmentation completely transparent, whereas 1 will render it opaque.
Ignore in AR: If this is switched on, the augmentation is not used in the project but displayed in the 3D view of the Wikitude Studio Editor only. This function can be used for augmentations which help to position other augmentations but should not be displayed in the final project.
Fullscreen Video: Select this mode when you want the video to be played back in fullscreen mode.
Overlay Video: Select this mode when you want the video to be played back on top of the target.
Overlay Video with alpha channel: Select this mode when you want to use a video that contains transparent background.
Play Immediately: Enable this setting when you want the video to start immediately after the target has been recognized by the user.
Resume on Recognition: Resumes the video from the position it paused when the target was lost, after the target is re-recognized.
Loop: Enable this setting when you like to playback the video in an endless loop. This setting is only available for overlay videos and overlay videos with alpha channel.
3D model
The augmentation 3D Model  allows you to display 3D models on top of your target image.
Properties
Position: Sets the x/y/z-position of your augmentation. The center of the coordinate system is the center of your image augmentation and the center of the target.
Rotation: Sets the rotation around the x/y/z-axis by a certain angle.
Scale: Sets the scale value of your augmentation.
Opacity: Sets the opacity of your augmentation. Setting the value to 0 makes the augmentation completely transparent, whereas 1 will render it opaque.
Ignore in AR: If this is switched on, the augmentation is not used in the project but displayed in the 3D view of the Wikitude Studio Editor only. This function can be used for augmentations which help to position other augmentations but should not be displayed in the final project.
Label
The label augmentation  for text is the most basic augmentation available in Wikitude Studio. Type in the preferred text, set the RGBA color of the text and that of the background, choose the font type and add it to your target. Once created, the label can be deleted, but it cannot be modified.
Properties
Position: Sets the x/y/z-position of your augmentation. The center of the coordinate system is the center of your image augmentation and the center of the target.
Rotation: Sets the rotation around the x/y/z-axis by a certain angle.
Scale: Sets the scale value of your augmentation.
Opacity: Sets the opacity of your augmentation. Setting the value to 0 makes the augmentation completely transparent, whereas 1 will render it opaque.
Ignore in AR: If this is switched on, the augmentation is not used in the project but displayed in the 3D view of the Wikitude Studio Editor only. This function can be used for augmentations which help to position other augmentations but should not be displayed in the final project.
Button
The button augmentation  will add a pre-styled button to your target image. Alternatively, you can upload a custom image and use it as a button. Once created, the button can be deleted, but it cannot be modified.
Properties
Position: Sets the x/y/z-position of your augmentation. The center of the coordinate system is the center of your image augmentation and the center of the target.
Rotation: Sets the rotation around the x/y/z-axis by a certain angle.
Scale: Sets the scale value of your augmentation.
Opacity: Sets the opacity of your augmentation. Setting the value to 0 makes the augmentation completely transparent, whereas 1 will render it opaque.
Ignore in AR: If this is switched on, the augmentation is not used in the project but displayed in the 3D view of the Wikitude Studio Editor only. This function can be used for augmentations which help to position other augmentations but should not be displayed in the final project.
Working with videos
Videos in an augmented reality scene are an effective way to provide a spectacular experience to your users. Videos can run in three modes and can come from different sources. You may upload videos to the Wikitude backend or provide an external link to the video.
Available modes:
Supported video sources:
Fullscreen Videos
Fullscreen videos are video files that play back in the native player of the device of the user. Instead of playing directly in the live camera, fullscreen videos will open a separate window and start the video player. When the user clicks back or closes the window will bring back the user to the augmented reality experience.

Overlay Videos
Overlay or augmented reality videos play back directly in the live camera view on top of an image or at a specific geo location. You can choose the size of the video and the position of it.
Note: In order for overlay images to work they need to be encoded with a certain video codec (H.264). The chapter video codecs describes in detail. Also not all devices are capable of play back an overlay video - read the chapter supported devices for details.
- hosted videos: Make sure to use H.264 encoded files, but other than that hosted files can be used as overlay videos.
- external link: we do not validate the link, so make sure the video behind the link works as expected. This can be tested in the preview.
Note:
- YouTube: Videos hosted on YouTube can not be used directly for overlay videos due to license restrictions. If you have access to the source video file, encode it into a H.264 video file, upload it to your server and you are good to go.
- Vimeo: Videos hosted on vimeo can not be used directly for overlay videos due to license restrictions. If you have access to the source video file, encode it into a H.264 video file, upload it to your server and you are good to go.
Overlay videos will play back immediately if this option is selected or otherwise start with the play back once the user clicks on the video. The video will pause and resume if user is moving away from the target image containing the video.
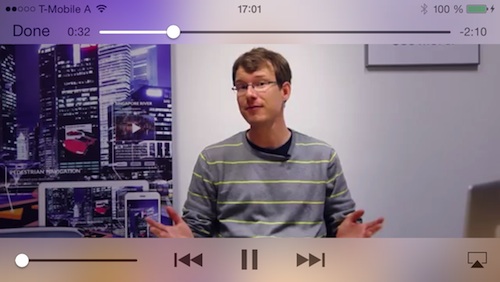
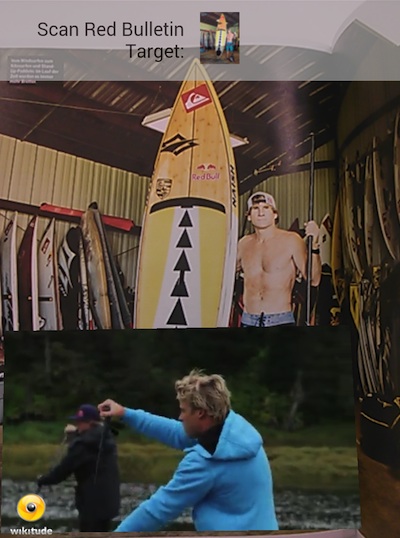
Overlay Videos with alpha channel
Beside standard videos Wikitude Studio can also handle videos with transparent background (alpha channel). Like transparent images, videos can have a transparent background.
![]()
![]()
Producing a transparent video is usually done using a green screen for filming and a technique called chroma key to replace the green background with transparency. Extensive information is available on the internet that should help you get started on this topic.
There are different video codecs that support alpha channels for motion picture and most of them will work as your raw material. We have extensively tested Apple ProRes 4444 codec for our own development and were satisfied with the results.
The Wikitude SDK can only render H.264 encoded videos, which is a codec that in practice does not support an alpha channel. The solution here is to include the alpha channel in a separate (visible) part of the video. The video is split vertically consisting of a color and a alpha channel in the final video below each other. The following image shows how the preprocessing result should look like.
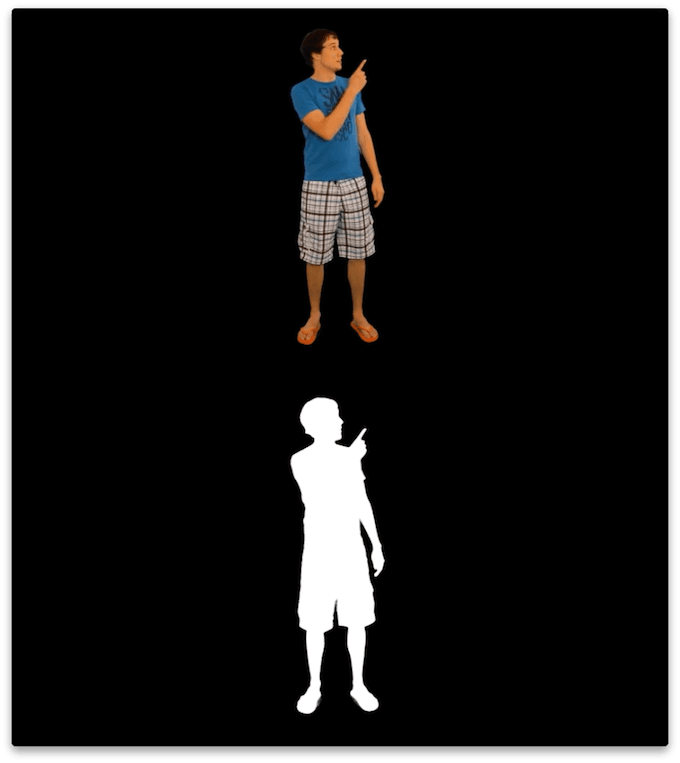
The upper half of the image transports the color information for the final video while the lower half includes a grayscale representation of the alpha layer. White areas will be fully opaque and black areas will be fully transparent. If you are familiar with Photoshop, think of the lower half as a mask. Resulting videos have an height that is exactly twice as big as the input video.
To convert your raw video to a valid input video for the Wikitude Studio you need to re-encode the video and
automatically create the alpha mask. The script below included in the Wikitude SDK (separate
download) uses ffmpeg to do so and wraps the necessary
commands. Follow these simple steps:
MacOS X
- Open the Terminal application
- Input
cd <SDK>/tools/video/MacOSX. Replace<SDK>with the path to the SDK folder - Execute
sh convert.sh <input video> <output video>. Replace<input video>with the path to your transparent video and<output video>with the path where you want the output video to be stored.
Windows
- Open the Command Line
cd <SDK>\tools\video\Windows. Replace<SDK>with the path to the SDK folder- Execute
convert.bat <input video> <output video>. Replace<input video>with the path to your transparent video and<output video>with the path where you want the output video to be stored.
This creates the required video with a vertically split color and alpha channel.
Position a video containing an alpha channel in the Wikitude Studio
The video you are uploading will be twice as high as the video the user is going to see. Make sure to consider this when placing the video on your target image.
Hosted Videos / External Links
There are two possibilities of creating a video augmentation:
- hosted videos: upload a video file
- external link: use any URL or link to a video, which is publicly accessible. This can anything from a link to a file in the public folder of Dropbox to a link to a video on your own server.
In any case, make sure to comply with the supported video codecs if you like to use overlay videos or overlay videos with alpha channel.
Supported Video Codecs
Unfortunately support of video throughout mobile devices is not straight forward. Devices and operating system differ in what videos they can play back and which videos they reject. To support all platforms the best solution is to use an H.264 encoded video with a maximum resolution of 720p (1280x720 pixel). To make things even more confusing the H.264 codec defines different profiles. Not all of them play back nicely so make sure that you are using either one of the following
- Baseline
- Extended
- Main
The recommendation for Android and iOS with broad support is to use H.264 (AVC) as codec (Baseline profile) with .mp4 as container format. For full list of media support on Android see the official guide or iOS web guide.
If the profile differs especially Android devices will most certainly misbehave (fail to play or crash entirely) when playing back those videos.
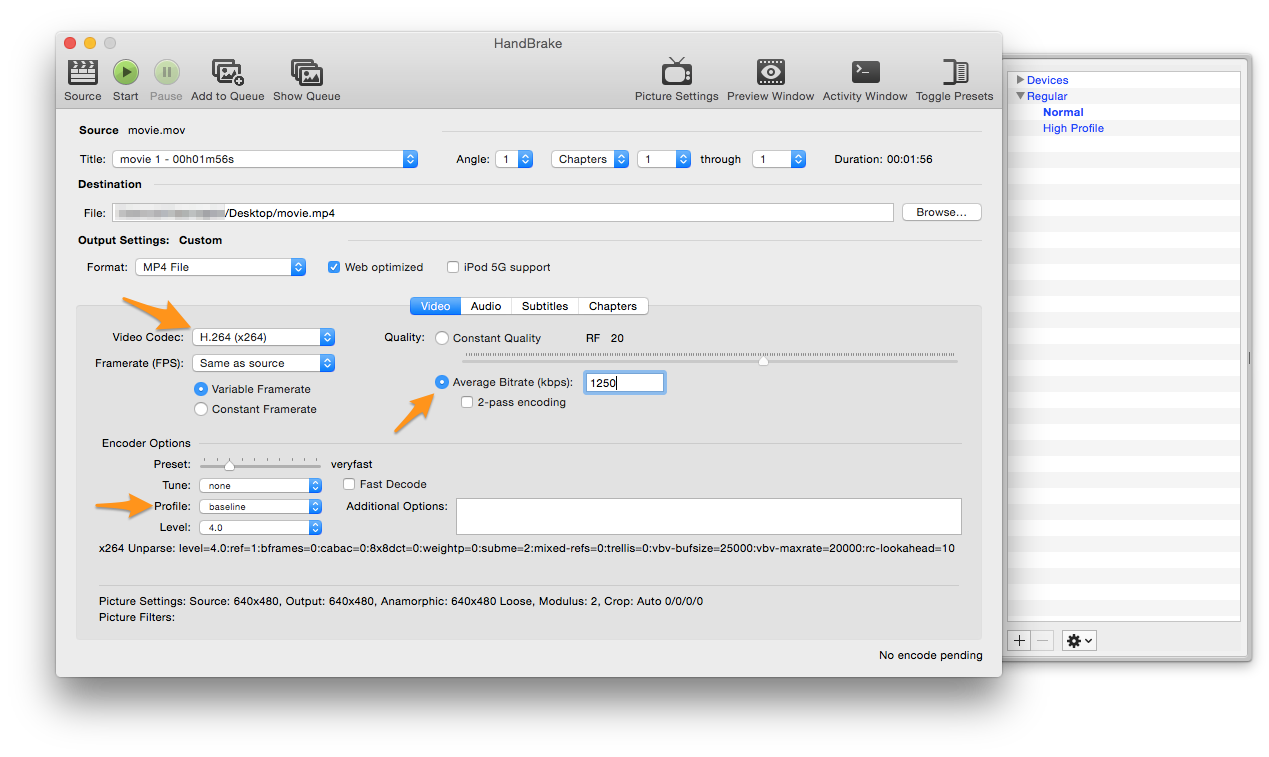
Here at Wikitude we use the app Handbrake for transcoding existing videos to the correct format. Below you see a screenshot with the settings we are using
- H.264 codec
- Baseline profile
- Limiting max video bitrate to 1250 kbps
Working with 3D models
3D Assets Workflow
Prerequisites
- A 3D model in FBX (.fbx) file format
- Wikitude 3D Encoder for Windows or MacOS X
3D content within the Wikitude SDK can only be loaded from so-called Wikitude 3D Format files (.wt3). This is a compressed binary format for describing 3D content, which is optimized for fast loading and handling of 3D content on mobile devices. You still can use 3D models from your favorite 3D modeling tools (like Autodesk® Maya® or Blender), but need to convert them into wt3 file format using the Wikitude 3D Encoder (encoder for short). The Encoder loads Autodesk® FBX® files (.fbx) and exports them to .wt3 files.
This section should give an overview on how to choose the right 3D models for displaying it in Wikitude's augmented reality SDK. As Wikitude is basing 3D support on a converted file format (.wt3) it is good to follow the best practices below.
Input format
Supported 3D model files for encoding wt3 files are:
- FBX (.fbx) - max version: 7.5 (FBX SDK 2017)
Features you can use in your 3D model source files:
- Mesh types
- Triangle-based meshes: The 3D models usually consist on a hierarchy of scenes nodes where the leaf nodes contain parts of a 3D mesh.
- Skin-based meshes: mesh vertices a placed relative to a list of joint nodes, so-called bones.
- Animations (currently not supported in Studio, but in the SDK)
- Key-frame-based transformations/rotations/scalings applied to mesh vertices or scene nodes.
- Bone animations for skin-based models.
- Textures
- All textures are converted to the PNG file format during the import. The converter accepts textures of the usual picture file formats, like JPEG, GIF, TIFF, ...
- Lights
- Diffuse (Lambert) lighting by specifying a directional light source.
- Specular (Phong) lighting by specifying specular light source (direction and specular exponent). Several light sources can be used within a scene. However, only one light source (including diffuse+specular light) can be used for each mesh part, i.e., scene node. Thereby the light source which is closest to the scene node within the scene hierarchy (by traversing the tree upwards) is used. That is, a light source specified as a root node will be applied to all mesh parts in a scene. Other light sources will be applied to all mesh parts which are lower in the scene hierarchy.
- NURBS (will be tessellated on import)
- Transparency
- Semi-transparent surfaces, like windows of a car, can visualized. , but only one semi-transparent layer can be visualized accordingly. The result of rendering several semi-transparent layers upon each other is
- Model size: There is no limit on the size of the 3D models in terms of numbers of mesh vertices or textures. However, for rendering the 3D models fluently on mobile devices we recommend to keep the total file size below 5-10 MB and the number of mesh vertices below 100k.
Features that are not (yet) supported
- bump maps/normal maps (normals are only evaluated on mesh vertices)
- multiple light sources per node
- multi-textured surfaces (more than one texture on the same mesh)
- multiple transparent layers (transparent layers are not depth queued)
- animated textures on 3D models
- height maps
Good practice when working with 3D models
Use png textures
Textures are stored in png format within wt3 files. While Wikitude 3D Encoder takes care of automatically converting textures to png, it is good practice to use png textures in the source 3D Model file.
Use power of 2 textures
The rendering hardware on mobile devices often requires expects textures to have dimensions which are a power of 2 textures (e.g. 64x64, 128x128, ...). Other texture dimensions can lead to unexpected results. Additionally, using power-of-2 textures yields a better rendering performance.
Validate texture paths
Textures can be stored within the FBX file or referenced by a file path. In the latter case, make sure to not use absolute paths since these often are not valid on other machines. Instead use relative paths. Texture files are also searched in the directory which contains the FBX file. We therefore recommend to provide external textures files in the same directory as the 3D model, i.e. the FBX file, itself.
Keep texture sizes as low as possible
Keeping texture sizes as low as possible, while maintaining the required details has several benefits. The exported .wt3 file will be smaller and therefore quicker to load. And your application will require less memory.
Use only one light
To maintain a good rendering performance each part of your model (node) is only affected by a single light source. You may use multiple lights in the source file but at render time only a single node is selected to affect a mesh part. We make a best guess, utilizing the scene graph to assign a light to the node. If lighting is not required simply remove the lights from your source 3D model file and/or set the corresponding material properties. This helps to speed up rendering.
Resolving problems
Different 3D modeling tools encode the 3D models differently during the FBX export which may lead to different rendering results when viewing the 3D models with other applications. We therefore recommend to verify your 3D model with the free Autodesk "FBX Reviewer".
3D Model which uses joints (bones) is distorted
Create a root joint node such that all other joint nodes share the same root node.
3D Model shows up correctly in Wikitude 3D Encoder but does not show on the device.
Check the file size of your wt3 file. Limiting the textures to the lowest size that maintains the required details. Keep the number of mesh vertices reasonable such that your targeted mobile device can cope with it.
Textures are missing
Check the error/warning dialog during the import process of the model it will give you detailed information on which textures are problematic. Make sure the texture paths are valid and accessible.
Project settings
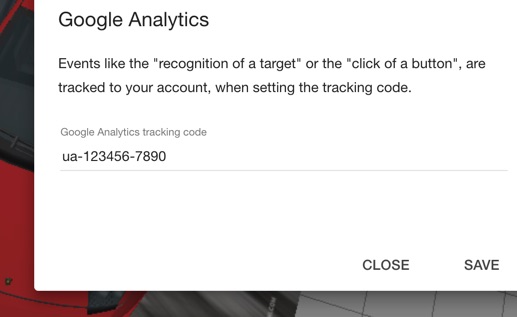
To activate Google Analytics tracking choose Project > Settings… from the menu.
Google Analytics
Entering a valid Google Analytics (GA) tracking code in the Settings dialog will allow you to track interactions with your experience to your Google Analytics account. Tracking will take effect in the Wikitude App, when interacting with an exported project or when interacting with a hosted project. Note that due to Google Analytics restrictions, event tracking does not work when bundling the experience into an application (GA internally processes the domain information).
The following table lists the currently tracked events and their meaning:
| Event | Description |
|---|---|
| TARGET_SCANNED | A target was recognized and scanned |
| TARGET_LOST | A target has been lost |
| TARGET_AUGMENTED | A target has been augmented |
| CREATED | An augmentation has been created |
| LOADED | An augmentation has been loaded |
| CLICKED | An augmentation has been clicked |
| DESTROYED | An augmentation is no longer needed (e.g., target lost) |
| PLAYED | A video augmentation started playing |
| PAUSED | A video augmentation has been paused |
| RESUMED | A video augmentation has been resumed |
| ERROR | An error occurred |
Project export options
To download and share your project, we provide 3 different options under the Project menu item:
Download offline project
You can download your project files for offline use by providing your email address. To open the dialog choose Project > Download offline project… from the menu. The augmented targets and all their assets will then be bundled and sent to you by email.
Hosting
If you'd like to make your project publicly available via a shareable link, you can host your project on our servers, by choosing Project > Hosting… in the menu.
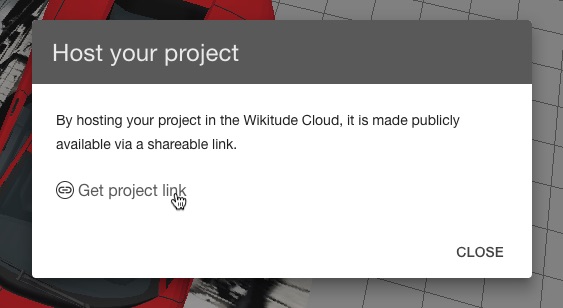
You may use the link directly in your own app. All augmentation changes to the project targets are applied immediately and available via your link. Keep in mind that the augmented targets of such a project are limited to 1,000 for this purpose.
App Template
The Wikitude App Templates are pre-configured app projects available for Android and iOS developers. Working with App Templates requires knowledge about application development. They are provided as first step to your own app. In combination with Studio the App Templates already contain your packaged Wikitude Studio project.
The App Templates are based on the Wikitude SDK and contain an unlicensed version of the library. For commercial use you require a valid license key - have a look at the Wikitude SDK licensing options for details.
Android App Template
Structure of App Template
The Wikitude App Template is an Android project with the Augmented Camera activity SampleCamActivity.java as a launcher. The pre-configured application name and application icon included in the App Template are placeholders. Also the package name com.wikitude.apptemplate should not be used in a productive environment and must be changed using e.g. ADT Eclipse or Android Studio.
Build & Run the App Template
Using a Wikitude Studio project
Import the App Template as a new project into your IDE. Then right click on your project and select Run as... > Android Application and select your target device (note: emulator is not supported).
In case you see compile time errors while building the project you may need to update your project.properties file to fit your installed Android SDK version.
Using your own AR project
Paste the content from your AR project into the assets folder. The index.html must be stored in assets/index.html to be automatically launched on app start. In case you want to load your content from a server, change SampleCamActivity.WORLD_PATH accordingly so that it points to your remote index.html (e.g. http://yourdomain.com/ar-world/index.html).
In your IDE then right click on your project and select Run as... > Android Application and select your target device (note: emulator is not supported). In case you see compile time errors while building the project you may need to update your project.properties file to fit your installed Android SDK version.
From App Template to App
First of all update the application name, icon and package identifier in AndroidManifest.xml. In case you want to implement other screens aside the AR View you need to remove the following line in SampleCamActivity's AndroidManifest.xml entry:
    <intent-filter>
        <action android:name="android.intent.action.MAIN" />
        <category android:name="android.intent.category.LAUNCHER" />
    </intent-filter>
and launch the camera e.g. when user clicked a button by calling
        final Intent arIntent = new Intent(this /* launching Activity */, SampleCamActivity.class);
        startActivity(arIntent);
That way you can create any application and define when to launch the augmented reality view. Have a look at the sample application bundled in the Wikitude Android SDK for basic and advanced usage of the SDK. A number of best practice implementation samples are provided and documented.
You are only allowed to have one
ARchitectView instance at any time. Have a look at different activity launch modes in case this does not fit your application architecture.
SDK licensing
The App Template is delivered without any Wikitude SDK License, therefore a watermark is embedded which covers the whole camera view. The watermark is shown on top of camera view because WikitudeSDKConstants.WIKITUDE_SDK_KEY does not contain a valid license. Have a look at the Wikitude SDK licensing options for details.
The project was created using the latest Eclipse ADT. Proper set-up of Android Development Environment is a prerequisite.
iOS App Template
Requirements
In order to run the application, the following requirements are given:
- A Mac computer running OS X 10.7 (Lion) or later
- Xcode
To be able to run the application on an iOS device, you must enroll to the Apple iOS Developer Program and enter your subscription details in the Xcode Account preference panel.
More information how to develop iOS Applications can be found here: Start Developing iOS Apps
App Template Structure
The Wikitude Studio App Template (App Template) is an Xcode project which simply shows a full screen Wikitude SDK View, loading your ARchitect World from Studio. The exported ARchitect World can be found in the WikitudeStudio folder.
If another ARchitect World should be used in the application, it's sufficient to replace the WikitudeStudio folder content with the new files. Make sure that the main .html file, which is used as starting point for the ARchitectWorld, is correctly referenced in the -loadArchitectWorldFromUrl method.
Build & Run the App Template
To run the application on a iOS device, simply select Product -> Run or click on the Play button in the upper left corner of the Xcode window.
Please note that the Wikitude SDK is not able to run in the simulator, therefore the application simply shows a black screen if it runs in the simulator.
Preparing the App
The pre-configured application name and application icon included in the App Template are placeholders. Also the bundle identifier com.wikitude.WikitudeStudioiOSAppTemplate must be changed in order to submit the application to the App Store (Make sure the bundle identifier you're using in the final application matches the one you've specified during the Wikitude SDK purchase process).
SDK licensing
The App Template is delivered without any Wikitude SDK License, therefore a watermark is embedded which covers the whole camera view. Have a look at the Wikitude SDK licensing options for details. After you have purchased the License which fits your needs most, enter the license key in the -initializeWithKey:motionManager method (WTViewController line 26).
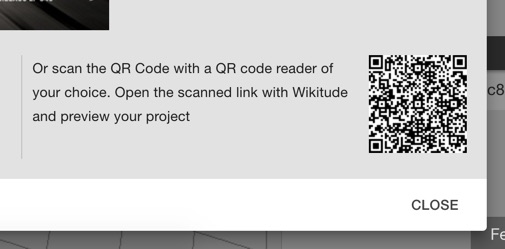
Preview
When you're augmenting a target, it might be useful to see your work in action. With the Studio Editor Preview option it's easy to test your project in the Wikitude app.

To preview your targets you need the Wikitude App. After opening the app, choose Developer from the app menu and enter your Wikitude Studio username and password. If you have entered the correct credentials, you will now see a list of all your projects. Select the project you want to preview and point the device camera at the respective target.
You can also use a QR code reader and scan the QR code shown in the preview dialog. This will take you directly to the camera view in the Wikitude app.