# Setup Guide
This guide will explain in detail how to get started with the Wikitude Unity SDK.
# Prerequsities
Please note that the Wikitude Unity SDK currently supports following Unity version, render APIs and OS versions:
| Requirements | ||
|---|---|---|
| Unity Editor | Unity 2020.3.17f1 LTS or higher running on Windows or macOS - The Intel version of the Editor is required, even on M1 Macs | |
| Compatible devices | iOS Version | 12.0 or higher |
| Android Version | 6.0 or higher | |
| UWP Version | 1803 (SDK 10.0.17133.0) or higher | |
| Rendering Engines |
| |
# Import the plugin
The latest version can be downloaded as an archive from the Wikitude website (opens new window).
The archive includes a pre-configured project with samples and an Unity package (which also includes the samples). If the plugin is intended to be imported into an existing project jump to the section import Wikitude.unitypackage. Otherwise, continue with the next section (and skip importing the Unity package afterwards).
# Open the Sample Project
The sample project included in the archive can be opened by adding it in the Unity Hub as another project. The location of the project is inside the downloaded archive's Examples folder. The Unity version for the project should be set to a supported version.
Two steps remain to be done after opening the project in order to be able to test the samples in the Editor or to export an application:
- A license key has to be set
- The build target has to be either iOS, Android or UWP. This setting can be found in the
Filedropdown menu by choosingBuild Settings.
After these steps the samples can be tested by either building a mobile app or by hitting the play button in a sample scene. There are multiple live preview modes available for testing in the Unity Editor.
# Import the Wikitude.unitypackage
The included .unitypackage file is not to be confused with a package in the package manager. Therefore, it can't be added through the package manager but with the usual Unity package import procedure described below.
In your Unity project, open the Assets dropdown menu and choose Import Package > Custom Package.
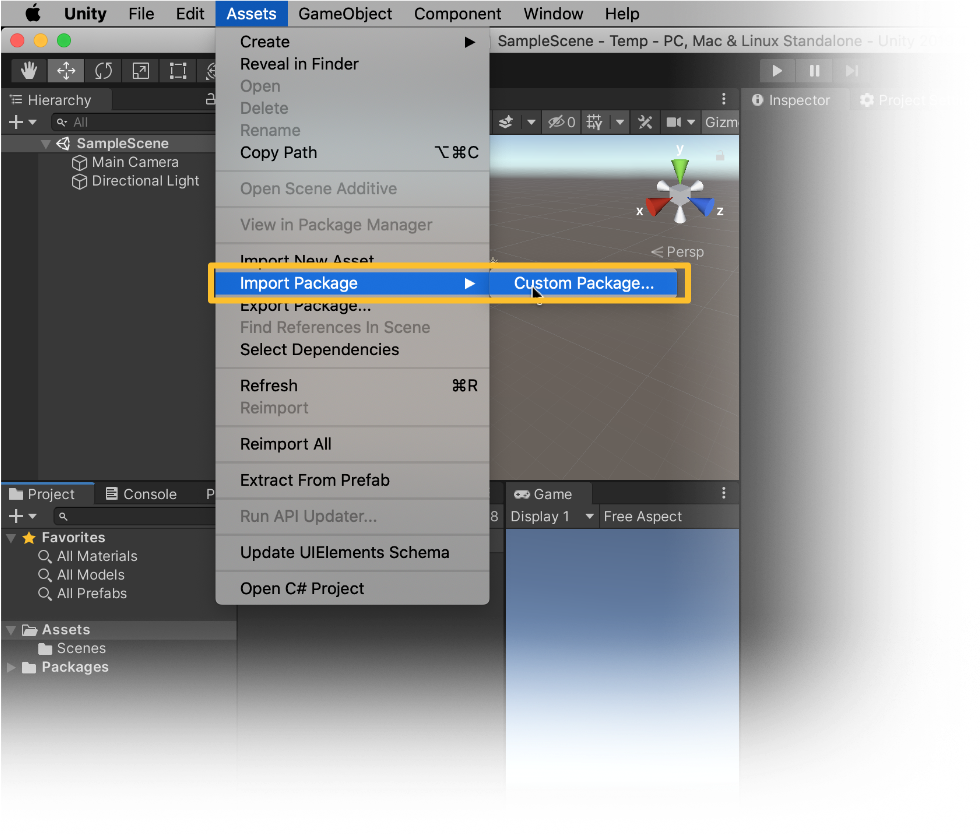
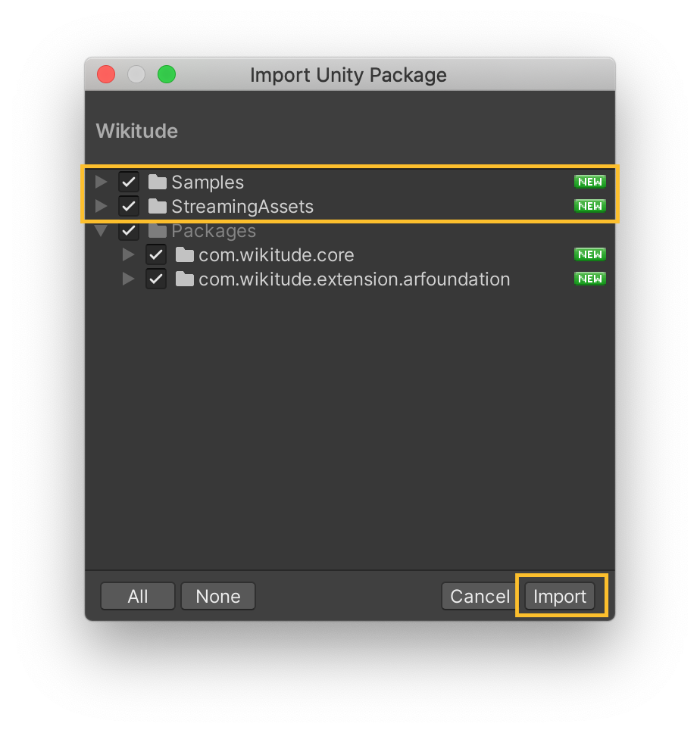
Select the .unitypackagefile in the presented browser and click open. If the samples are not needed, the Samples and StreamingAssets folder can be deselected from the list. They can always be re-imported later through the Package Manager.
Three steps remain to be done after importing the assets into the project in order to be able to test the samples in the Editor or to export an application:
- A license key has to be set
- The build target has to be either iOS, Android or UWP. This setting can found in the
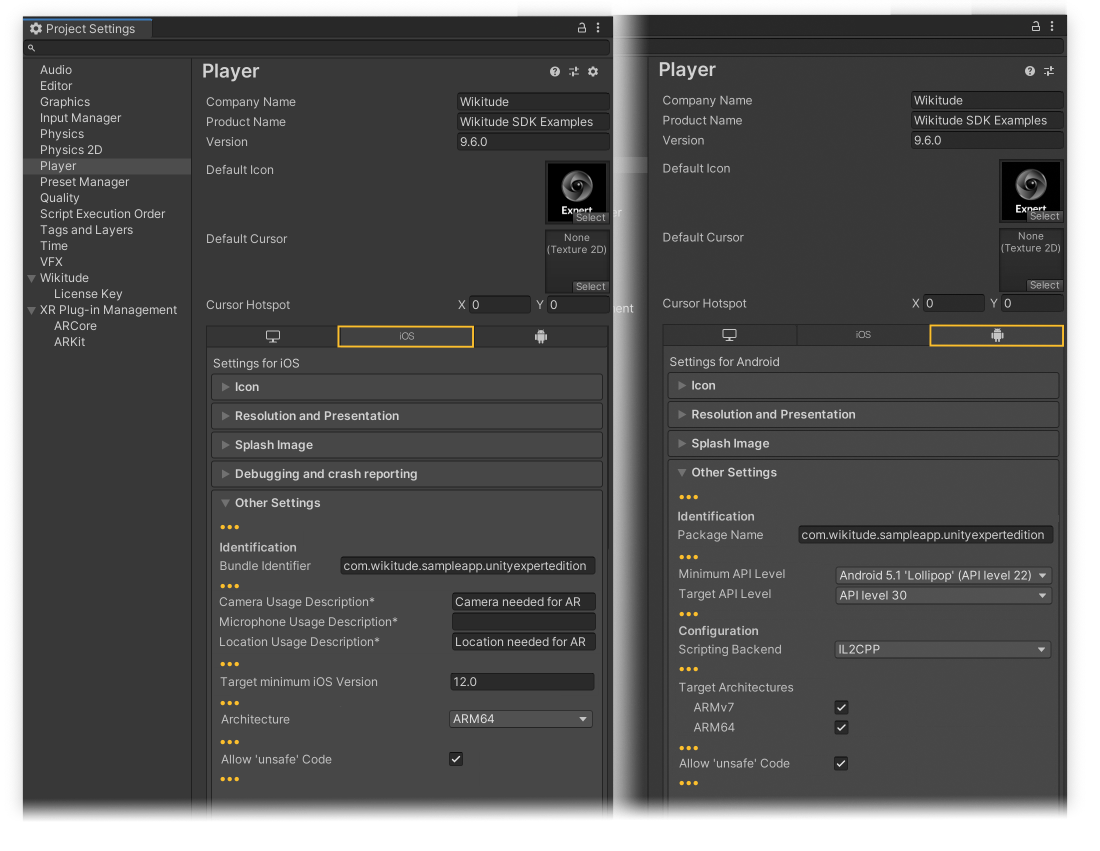
Filedropdown menu by choosingBuild Settings. - Additionally, the following Player settings have to be set (by opening the
Projects settingsin theEditdropdown menu and underPlayer > iOS/Android/UWP > Other Settings).- The bundle identifier for iOS, Android and UWP has to be changed to
com.wikitude.sampleapp.unityexpertedition. - The toggle
Allow 'unsafe' codeshould be enabled (required for theWikitude SDK Extension - AR Foundationpackage). - For Android, the minimum API level should be set to 6.0 or higher and the
Scripting Backendshould be set toIL2CPPwithARM64enabled in theTarget Architectures. - For iOS, the minimum targeted iOS version should be set to 12.0 or higher and a
Camera Usage Descriptionas well as aLocation Usage Descriptionshould be provided. Additionally, the Architecture should be set toARM64.
- The bundle identifier for iOS, Android and UWP has to be changed to
Location Usage Description requirement
The location usage description is required because location services are used for Geo AR purposes in the iOS plugin. Wikitude uses a common codebase throughout the products and even though this functionality is not exposed for Unity developers at the moment, Xcode still detects the presence of Geo AR, triggering a warning if the description is missing.
Building for Android 11
If Android 11 (API Level 30) support is required, additional settings might be required depending on the used Unity version. Please refer to the Google documentation (opens new window) therefore.
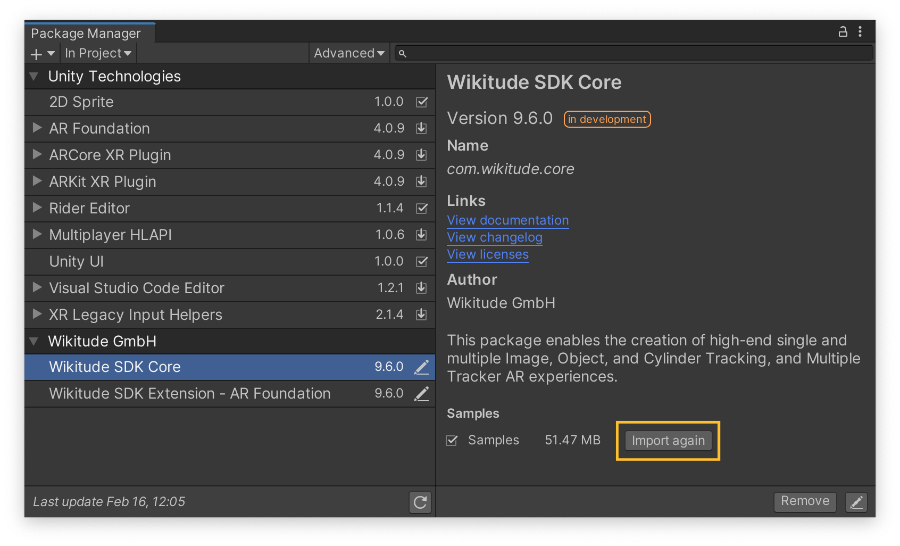
# Re-import sample assets from the Package Manager
The sample assets can always be re-imported via the package manager. This might be useful to get insights how certain concepts have been solved before and to use or tailor sample assets or scripts.
There are two packages provided in the downloaded archive. The Wikitude SDK Core package provides the needed runtimes (both for an export and the Editor), whereas the Wikitude SDK Extension - AR Foundation package provides additional assets to run the Wikitude SDK in an AR Foundation environment.
# Exporting for iOS, Android and UWP
The sample project already has every necessary setting for exporting to iOS, Android or UWP applied in the Player Settings. For a manual setup, the settings described in the import Wikitude.unitypackage section should be applied before an export can be issued.
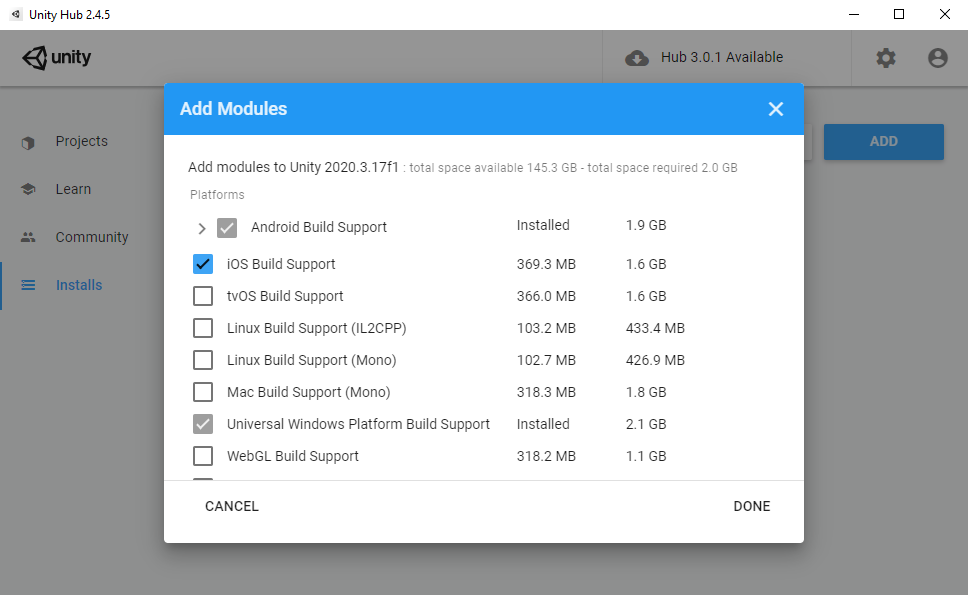
Additionally, the support modules for the targeted platform should be installed for the used Unity version. This can also be done after the Unity installation by pressing the menu button on the Unity version (in the Installs panel) and choosing Add Modules.
# Export a Xcode project for iOS
- Open the Build Settings (which can be found in the
Filedropdown menu). - Make sure
iOSis the current build target. If not, selectiOSfrom the list and clickSwitch Platform. - Click
Build and Runand choose where to save the Xcode project. In order to run the application on a device, please refer to the Apple documentation (opens new window).
# Export an .apk file for Android
If you don't need an Android Studio project, building directly from Unity is the fastest way to run your app on an Android device.
- Open the Build Settings (which can be found in the
Filedropdown menu). - Make sure
Androidis the current build target. If not, selectAndroidfrom the list and clickSwitch Platform. - Click
Build And Runand choose where to save the .apk file. If you have an Android device connected, it will also install the app on it.
# Export an Android Studio project
Open the Build Settings (which can be found in the
Filedropdown menu), enable theExport Projectoption and clickExport.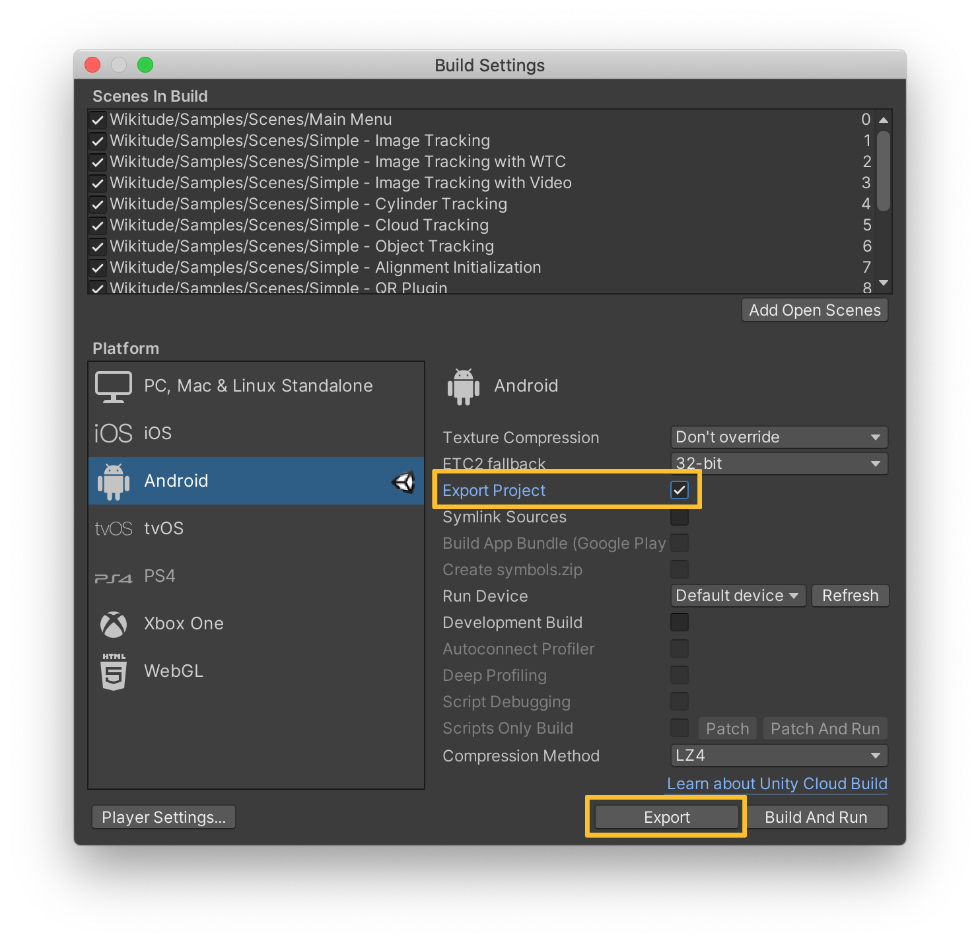
Ensure the project folder contains no space, otherwise you will have trouble deploying the project.
Open Android Studio and click
Open an existing Android Studio project.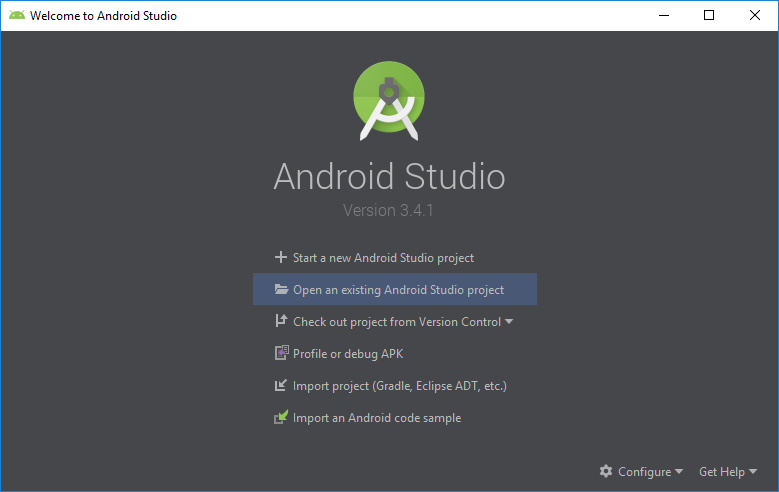
Within the file selection dialog, navigate to the folder where you exported the project and select the folder named after your app.
Android Studio may ask you to upgrade gradle, accept.
Android Studio may complain about
minSdk versionandtargetSdk versionbeing set. Remove the line from theAndroidManifest.xml(<uses-sdk android:minSdkVersion="23" android:targetSdkVersion="31" />), and re-run gradle.The project is now running in Android Studio
# Export a Visual Studio project for UWP
- Open the Build Settings (which can be found in the
Filedropdown menu). - Make sure
UWPis the current build target. If not, selectUWPfrom the list and clickSwitch Platform. - Select on which device should the application run.
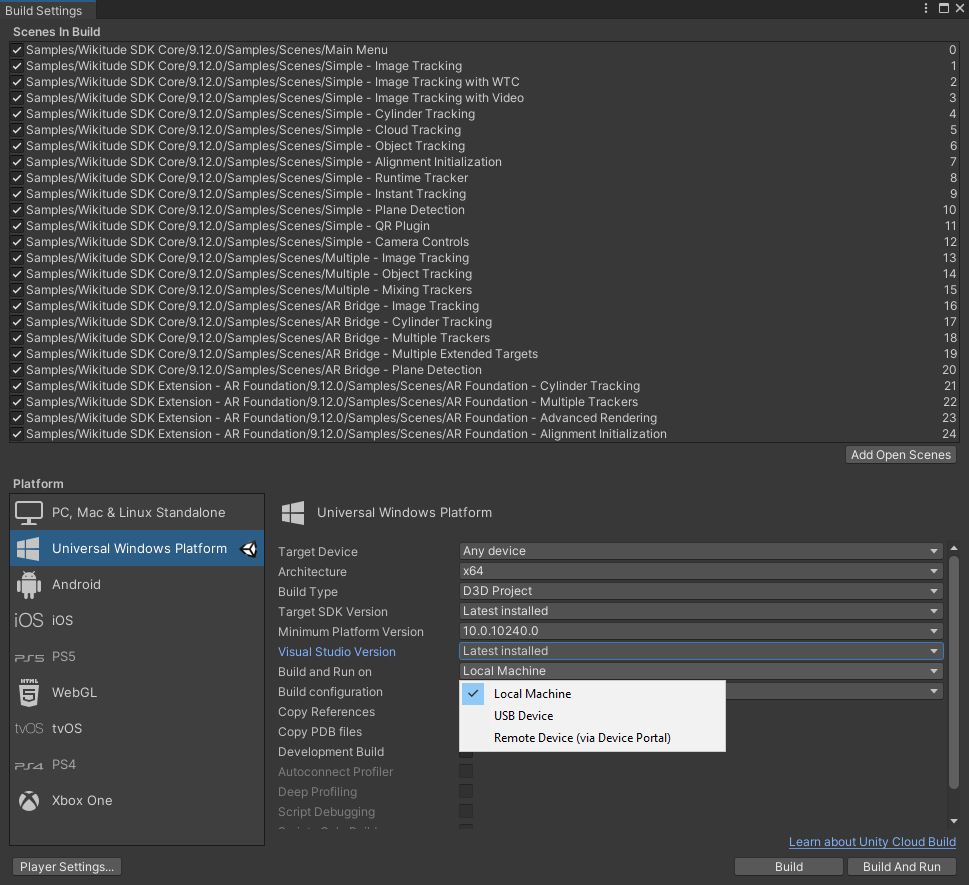
- Click
Build and Runand choose where to save the Visual Studio project. If you didn't select any Windows device, the application will be installed in theLocal Machine, using the webcam as the main camera.