Advanced Image Recognition
This sample consists of three partsGestures (1/3)
The Wikitude SDK supports a number of gestures, which allow you to interact with augmentations.
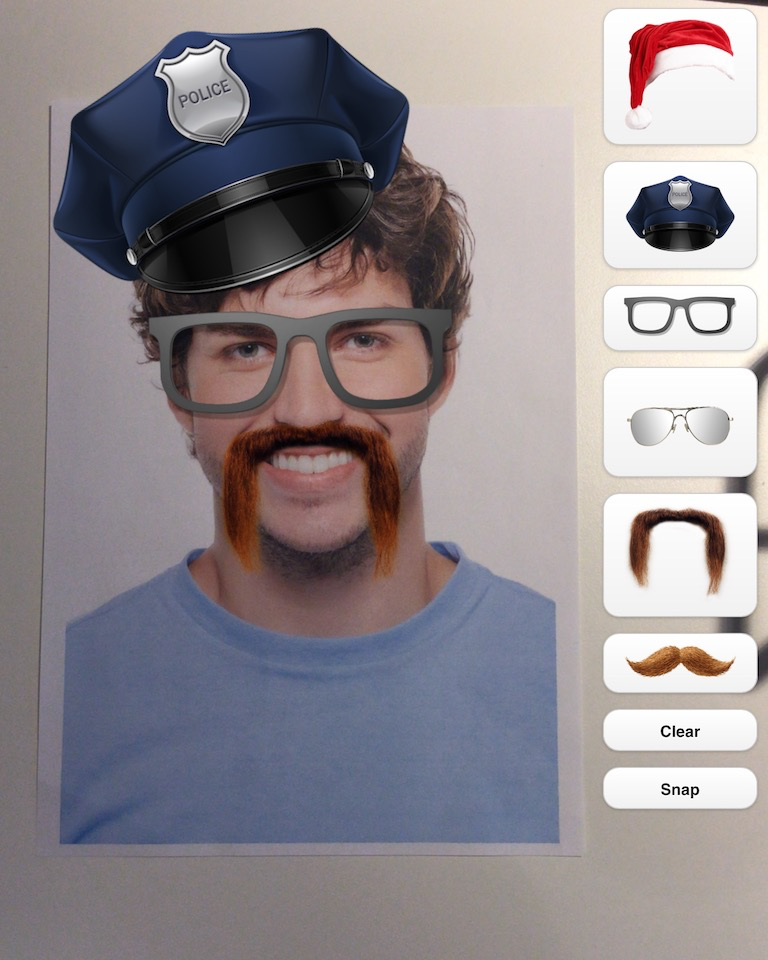
This example shows how to use three of those gestures in an AR scene to drag, rotate and scale images of glasses, beards and hats so they can be positioned on a face.

Whenever an AR.ImageDrawable is created you can define which gestures it should respond to.
This sample uses three different gesture types: drag, rotate and scale, each of which has three callback functions (e.g. onDragBegan, onDragChanged and onDragEnded) to define the AR.ImageDrawable's reaction to gestures.
In this example we want our AR.ImageDrawable to react to all three gesture types.
var overlay = new AR.ImageDrawable(imageResource, 1, {
    onDragBegan: function(x, y) {
        return true;
    },
    onDragChanged: function(x, y) {
        return true;
    },
    onDragEnded: function(x, y) {
        return true;
    },
    onRotationBegan: function(angleInDegrees) {
        return true;
    },
    onRotationChanged: function(angleInDegrees) {
       return true;
    },
    onRotationEnded: function(angleInDegrees) {
       return true;
    },
    onScaleBegan: function(scale) {
        return true;
    },
    onScaleChanged: function(scale) {
       return true;
    },
    onScaleEnded: function(scale) {
       return true;
    }
});
If you wanted to make only one AR.ImageDrawable rotatable this would be a basic implementation:
onRotationBegan: function(angleInDegrees) {
    return true;
},
onRotationChanged: function(angleInDegrees) {
   this.rotate.z = previousRotationValue + angleInDegrees;

   return true;
},
onRotationEnded: function(angleInDegrees) {
   previousRotationValue = this.rotate.z;

   return true;
}
Every onChanged callback tells us the difference between the value when the gesture began and its current value. This is why we have to save the AR.ImageDrawable's last rotation value before the gesture (previousRotationValue) in order for the rotation to behave correctly. After the gesture has ended, we update that variable to the current rotation value.
Since we don't want to drag, scale and rotate just one, but many instances of AR.ImageDrawable we have to save values for each of them:
onRotationBegan: function(angleInDegrees) {
    return true;
},
onRotationChanged: function(angleInDegrees) {
   this.rotate.z = previousRotationValue[index] + angleInDegrees;

   return true;
},
onRotationEnded: function(angleInDegrees) {
   previousRotationValue[index] = this.rotate.z;

   return true;
}
Now every single AR.ImageDrawable has its last scale, position and rotation value stored in an according array. After you have added the instances of AR.ImageDrawable to the scene you can drag them around with one finger, rotate them with two fingers or scale them with the pinch gesture.

In our sample we use the variable oneFingerGestureAllowed to better determine which kind of gesture is currently active. drag is the only gesture which uses only one finger, so it has to be stopped as soon as a gesture with two fingers is started. The callback function that reacts to this event is called AR.context.on2FingerGestureStarted. We set oneFingerGestureAllowed to false every time this function is called.
onDragBegan: function(x, y) {
    oneFingerGestureAllowed = true;

    return true;
},
onDragChanged: function(x, y) {
    if (oneFingerGestureAllowed) {
        this.translate = {x:previousDragValueX[index] + x, y:previousDragValueY[index] - y};
    }

    return true;
},
onDragEnded: function(x, y) {
    previousDragValueX[index] = this.translate.x;
    previousDragValueY[index] = this.translate.y;

    return true;
}
onDragChanged only does what it is supposed to if oneFingerGestureAllowed is true, which is why we set it to true every time a new drag begins.
Distance to target (2/3)
This section shows how to measure the distance to a given target, and how to react to changes in the measured value.
The AR scene is based on the code of the first sample, with a target collection containing just one target.We define the physical size of the target when creating the AR.ImageTracker.
This is not always necessary, since a target collection can include the definition of the physical size for all targets (see Target Management for more details).
The physicalTargetImageHeights option is used for this purpose, with values in millimeters for each target.
For this example, we assume the target is printed on a standard A4 sheet with a physical height of 286mm, if your target size is different, change the value accordingly, otherwise the measurement won't be very accurate.
this.targetCollectionResource = new AR.TargetCollectionResource("assets/magazine.wtc");
this.tracker = new AR.ImageTracker(this.targetCollectionResource, {
    onTargetsLoaded: this.worldLoaded,
    physicalTargetImageHeights: {
        pageOne:    286
    }
});
Then we declare the callback function to be called when the distance changes, and the change threshold in millimeters to trigger the event:
var pageOne = new AR.ImageTrackable(this.tracker, "*", {
    drawables: {
        cam: overlayOne
    },
    distanceToTarget: {
        changedThreshold: 1,
        onDistanceChanged: function(distance) {
            document.getElementById('distanceDisplay').innerHTML = "Distance from target: " + distance / 10 + " cm";
            overlayOne.rotate.z = distance;
        }
    },
    onExitFieldOfVision: function() {
        document.getElementById('distanceDisplay').innerHTML = "Distance from target: unknown";
    }
});
The drawable definition is just the same as the first section.
The option distanceToTarget describes how the tracker will react to changes. The threshold is set to 1 millimeter, and the callback function displays the value on the bottom of the screen, and rotates the augmentation when the user moves towards the target or away from it.
We also define an onExitFieldOfVision trigger because we don't want to show any information when the target is not visible.
Extended Tracking (3/3)
Extended tracking is an optional mode you can set for each AR.ImageTrackable separately. In this mode the Wikitude SDK will scan the environment of the user and try to keep track of the scene even if the original target image is not in view anymore. So the tracking extends beyond the limits of the original target image. The performance of this feature depends on various factors like computing power of the device, background texture and objects.
If a target is enabled for extended tracking the onExitFieldOfVision trigger is not called when the original target image is not visible anymore, but once the extended tracking is interrupted.
If you don't need this feature, we recommend not to enable it to avoid high CPU load.
In the sample the AR.ImageTrackable is defined as usual with the difference that the option enableExtendedTracking is set to true.
If you need informations about the quality of the extended tracking, you must define the callback function onExtendedTrackingQualityChanged like in the example below.
var pageOne = new AR.ImageTrackable(this.tracker, "*", {
    drawables: {
        cam: [pipes]
    },
    enableExtendedTracking: true,
    onExtendedTrackingQualityChanged: function (targetName, oldTrackingQuality, newTrackingQuality) {
        var backgroundColor;
        var trackingQualityText;

        if ( -1 == newTrackingQuality ) {
            backgroundColor = '#FF3420';
            trackingQualityText = 'Bad';
        } else if ( 0 == newTrackingQuality ) {
            backgroundColor = '#FFD900';
            trackingQualityText = 'Average';
        } else {
            backgroundColor = '#6BFF00';
            trackingQualityText = 'Good';
        }
        var cssDivInstructions = " style='display: table-cell;vertical-align: middle; text-align: middle; width: 50%; padding-right: 15px;'";
        var messageBox = document.getElementById('loadingMessage');
        messageBox.style.backgroundColor = backgroundColor;
        messageBox.innerHTML = "<div" + cssDivInstructions + ">Tracking Quality: " + trackingQualityText + "</div>";
        messageBox.style.display = 'block';
    }
});
With that enabled the tracking will continue even if the target image is lost.