Client Recognition
This example shows how to recognize images in the viewfinder and overlay it with images.
For a better understanding, here are some terms that will be used in the following and other section of this documentation related to vision-based augmented reality.
Target: A 2D target image and its associated extracted data that is used by the tracker to recognize an image.
Target Collection: An archive storing a collection of 2D targets that can be recognized by the tracker. A target collection can hold up to 1000 targets. Target collections are stored as
.wtcfiles3D Tracking Map: A tracking map is the equivalent of a target for 3D tracking. The map contains the relevant characteristics of a three-dimensional object. In order to recognize and track 3D objects you need to record a map first and then load this map. Maps are stored as
.wtmfiles.ClientTracker: The tracker analyzes the live camera image and detects the 2D targets stored in its associated target collection. Multiple trackers can be created, however only one tracker can be active for recognition at any given time.
Simple Client Tracking in Unity
The Wikitude Unity Plugin is based on pre configured prefabs. There are two types of prefabs available. One is the WikitudeCamera prefab and the other ones are tracker prefabs.
WikitudeCamera Prefab
The WikitudeCamera prefab takes care about rendering the live camera stream fullscreen at a certain distance from the camera. Attached to this prefab is a script component which has one parameter that is not pre filled. This parameter is for the Wikitude SDK license key and has to be filled with your very own license key. You can either buy a commercial license from our webpage or download a free trial license key and play around with our Native SDK in combination with Unity.
ClientTracker Prefab
To add a tracker prefab to the scene, simply drag the ClientTracker prefab into the scene hierarchy.
A ClientTracker itself needs a Wikitude Target Collection (.wtc file) which contains information needed to detect those reference images. Target collections can be generated and downloaded from the Wikitude Target Manager - a free web based tool, that you can access with your developer account. Place the .wtc file into the StreamingAssets folder, so that the Wikitude Native SDK can load them at runtime. To specify which .wtc file should be used, select the ClientTracker game object in the scene. Using the dropdown under Target Collection you can choose the desired one.
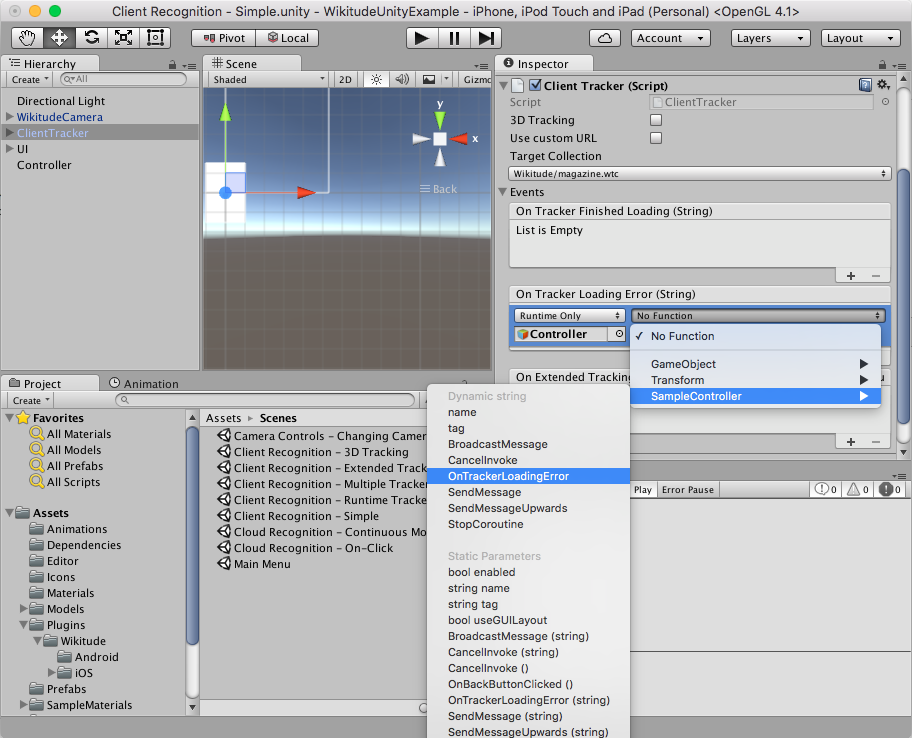
To react on events like successfully loading of a .wtc file, you can use the Unity Events listed in in the inspector of the ClientTracker. On the desired event, click the plus sign to add a new subscriber, drag the GameObject that should receive the event over the None (Object) field and select the function you want to be called from the No Function dropdown.
When subscribing to events that have a single basic parameter type, make sure to select your function from top list marked with Dynamic, rather than the static version from the bottom. This ensures that the parameters are passed correctly from the Wikitude plugin and are not overwritten by Unity.
For more information on working with Unity Events, please check the Unity Manual and Events Tutorial.
Define custom augmentations
Also part of the ClientTracker prefab is a Trackable object. A trackable defines on which image target which augmentation should be drawn. To do so, enter the target name into the TargetPattern text field. Possible values are full target image names (e.g. pageOne, pageTwo) or wildcards (page*).
In order to place 3D objects at the location where the reference image was found in the camera stream, add any GameObject as a child to the Trackable object. Its transform component will be updated every time the reference image was found in the camera stream and so the custom augmentation will be placed correctly.
To enable or disable the augmentation based on visibility, make sure to handle the OnEnterFieldOfVision and OnExitFieldOfVision events on the trackable. Please see the Client Recognition - Simple scene to see an example of how to set this up.
Extended Tracking
Extended tracking is an optional mode you can set for each target separately. In this mode the Wikitude SDK will try to continue to scan the environment of the user even if the original target image is not in view anymore. So the tracking extends beyond the limits of the original target image. The performance of this feature depends on various factors like computing power of the device, background texture and objects.
To enable Extended Tracking, on the Trackable object you can select the Extended Tracking option and the list below should be filled with the names of the targets that should be extended. Setting it as a wildcard * will track all targets in extended mode.
When Extended Tracking is enabled, the ClientTracker will fire OnExtendedTrackingQualityChangedEvents, which will let you know how well extended tracking is working based on the factors mentioned above.
Multiple Trackers
You can have multiple trackers in the same scene, but only one can be active at a time. If you enable a second one, the first one will be automatically disabled by the plugin.
Having multiple Cloud Trackers is also possible.
Runtime Tracker
Client trackers can be created at runtime with no restrictions on the location of the target collection used. To do this, simply create a new GameObject and add the ClientTracker component to it. If you are using a collection located in the StreamingAssets folder, the TargetPath property should be the path relative to the StreamingAssets folder and UseCustomUrl property should be false.
If you want to use a collection located elsewhere on the device or on the web, the TargetPath property should be set to the absolute path to the target, prefixed by the protocol "file://", "http://" or "https://" as appropriate. The UseCustomUrl in this case should be set to true. Please see the sample Client Tracker - Runtime Tracker as an example of how to set this up.
Trackables can also be created at runtime, but make sure to add them as a child of the tracker, before the Start() method is called on the parent tracker, otherwise it won't get registered in time.
GameObject trackerObject = new GameObject("ClientTracker");
ClientTracker newTracker = trackerObject.AddComponent<ClientTracker>();
newTracker.UseCustomUrl = true;
newTracker.TargetPath = "https://url.to.your.collection/collection.wtc";

GameObject trackableObject = GameObject.Instantiate(TrackablePrefab);
trackableObject.transform.SetParent(newTracker.transform, false);
Creating trackers at runtime is also possible for Cloud Trackers.
3D Client Tracking
Client Trackers also support 3D tracking. For an overview of 3D tracking, please see 3D Tracking.
To use 3D tracking, a 3D map needs to be recorded first. The TrackingMapRecorder is the component that enables you to do this. First set the name for the map in the Tracking Map Name field and subscribe to the events listed below. To start the recording, simply call the StartRecording function. If you are subscribed to the OnRecordingQualityChanged, you will receive updates about the quality of the recording. The quality should be Good before stopping the recording. To stop the recording, call the StopRecording function on the TrackingMapRecorder component.
After the recording was stopped, the OnRecordingFinished will be called, and the parameter will point to the absolute path where the 3D map was saved. This path can be used to create a new ClientTracker. Make sure to add the "file://" protocol to it and set it to the TargetPath, set UseCustomUrl to true and set Use3DTracking to true also.
If you already have a 3D map before building the project, you can save it in the StreamingAssets folder and setup the ClientTracker to use it in the inspector. Be sure to select Use 3D Tracking before, or the inspector will only list .wtc files, not .wtm files.