Setup Guide Glass
Project Setup
- Download GDK (Glass Development Kit) from the GDK page
- Follow instructions on how to setup a GDK Android application found in the Glass Development Kit documentation. (There is also a working SampleProject bundled in this SDK, where all these steps are already made)
- Create a
libsfolders in your project root directory and copylibs/wikitudesdk.jar In Eclipse enter
Preferences->Android->Buildand ensure the optionForce error when external jars contain native librariesis unchecked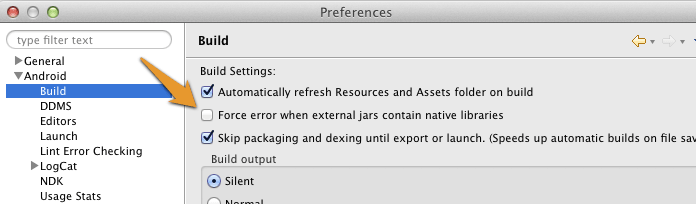
Enter a valid trial license key. Read the chapter on how to obtain a trial key.
Add the following permissions to your Manifest.xml
<uses-permission android:name="android.permission.INTERNET" />
<uses-permission android:name="android.permission.ACCESS_COARSE_LOCATION" />
<uses-permission android:name="android.permission.ACCESS_FINE_LOCATION" />
<uses-permission android:name="android.permission.ACCESS_NETWORK_STATE" />
<uses-permission android:name="android.permission.ACCESS_WIFI_STATE" />
<uses-permission android:name="android.permission.ACCESS_GPS" />
<uses-permission android:name="android.permission.CAMERA" />
<uses-permission android:name="android.permission.WRITE_EXTERNAL_STORAGE" />
<uses-feature android:name="android.hardware.camera" android:required="true" />
<uses-feature android:name="android.hardware.location" android:required="true" />
<uses-feature android:name="android.hardware.sensor.accelerometer" android:required="true" />
<uses-feature android:name="android.hardware.sensor.compass" android:required="true" />
<uses-feature android:glEsVersion="0x00020000" android:required="true" />
- The activity holding the AR-View (called
architectViewin the following) must have setandroid:configChanges="screenSize|orientation"in theAndroidManifest.xml
for example this could look like:
<activity android:name="com.yourcompany.yourapp.YourArActivity"
   android:configChanges="screenSize|orientation"/>
- Enter a valid trial license key. Read this chapter on how to obtain a free trial key.
AR View in Activity
Keep in mind that the Wikitude SDK is not a native Android SDK as you know from other SDK's. The basic concept is to add a so called architectView in your project and notify it about lifecycle events. The architectView creates a camera surface and handles sensor events.
The experience itself, named ARchitect World, is implemented in JavaScript and packaged in your application's asset-folder (as in this project) or on your own server.
ARchitectWorlds are written in HTML/JavaScript and call methods in Wikitude's AR-namespace (e.g. AR.GeoObject).
You must include
<script src="architect://architect.js"></script>
in your ARchitect world HTML files in order to be able to use the AR namespace. The architectView will handle them properly. To test an ARchitect World on a desktop browser, you must include ade.js tool instead to avoid JavaScript Errors and see a development console.
It is recommended to handle augmented reality in a separate Activity.
Declare the architectView inside a layout XML.
E.g. Add this within FrameLayout's parent tags.
<com.wikitude.architect.ArchitectView android:id="@+id/architectView"
   android:layout_width="fill_parent" android:layout_height="fill_parent"/>
ArchitectView is creating a camera surface so ensure to properly release the camera in case you're using it somewhere else in your application.
Besides the rear-camera the ArchitectView also makes use of compass and accelerometer values, requires OpenGL 2.0 and at least Android 2.3.
ArchitectView.isDeviceSupported(Context context) checks wether the current device has all required hard- and software in place or not.
Note: Make AR-View only accessible to supported devices
It is very important to notify the ArchitectView about life-cycle events of the Activity.
Call architectView's onCreate(), onPostCreate(), onPause, onDestroy() inside your Activity's lifecycle methods.
Best practice is to define a member variable for the architectView in your Activity. Set it right after setContentViewin Activity's onCreate(), and then access architectView via member-variable later on.
this.architectView = (ArchitectView)this.findViewById( R.id.architectView );
final ArchitectConfig config = new ArchitectConfig( "" /* license key */ );
this.architectView.onCreate( config );
Activity's onPostCreate() is the best place to load the AR-Experience.
this.architectView.onPostCreate();
this.architectView.load( "YOUR-AR-URL" );
The architectView.load() argument is the path to the HTML file that defines your AR experience. It can be relative to the asset folder root or a web URL (starting with http:// or https://).
e.g. architectView.load('arexperience.html') opens the HTML file in your project's assets-folder, whereat architectView.load('http://your-server.com/arexperience.html') loads the file from a remote server via HTTP.
Note: You can only pass arguments to the HTML file when loading it via URL. architectView.load('arexperience.html?myarg=1') does not work.
Location
Management of the location is important in geo-based augmented reality applications. Depending on the use-case location is used via GPS or network and may be updated every second or once in a while.
Although the SDKExamples project provides a basic implementation of a LocationProvider this is by far not the best location strategy available for Android.
Please use your own advanced location strategy implementation in case you have special requirements.