Instant Tracking
The following sections detail the instant tracking feature of the Wikitude Native SDK by introducing a minimal implementation, showcasing the simplicity the Wikitude Native SDK provides.
SMART - Seamless AR Tracking
SMART is a seamless API which integrates ARKit, ARCore and Wikitude’s SLAM in a single augmented reality SDK, cross-platform, for any device. It ensures the delivery of the best possible augmented reality experience on a wider range of devices, covering 92,6% of iOS devices and about 35% of Android devices available in the market.
SMART is enabled by default but can be disabled by unchecking the SMART Enabled checkbox located at the top of the Instant Tracker inspector.
Alternatively, it can be disabled in code using the SMARTEnabled property on the InstantTracker. Please keep in mind that this needs to happen before the InstantTracker initializes its native counterpart, which happens during the OnEnable method.
public InstantTracker tracker;

void Awake() {
    tracker.SMARTEnabled = false;
}
To check if the device supports platform assistance for tracking, WikitudeSDK.IsPlatformAssistedTrackingSupported can be called. Please keep in mind that this needs to be called after the Start method of the WikitudeCamera was executed, to make sure that the native components are properly initialized.
The IsPlatformAssistedTrackingSupported method doesn't return the result immediately, but takes an Action as a parameter, that will be called when the result is available
Tracker.IsPlatformAssistedTrackingSupported((SmartAvailability smartAvailability) => {
    if (smartAvailability == SmartAvailability.Supported) {
        /* Device offers platform tracking capabilities (ARKit or ARCore) */
    }
});
SMART provides improved tracking capabilities at the expense of control. Because of that some Wikitude SDK features are not available when platform tracking capabilities are used by enabling SMART.
| Features | SMART ON and platform assisted tracking supported | SMART OFF |
|---|---|---|
| Improved Tracking | ✓ | x |
| Plane Orientation | x | ✓ |
| Camera Control | x | ✓ |
| Save and Load Instant Targets | x | ✓ |
| Plane Detection | x | ✓ |
Introduction
Instant tracking is an algorithm that, contrary to those previously introduced in the Wikitude SDK, does not aim to recognize a predefined target and start the tracking procedure thereafter, but immediately start tracking in an arbitrary environment. This enables very specific use cases to be implemented.
The algorithm works in two distinct states; the first of which is the initialization state. In this state the user is required to define the origin of the tracking procedure by simply pointing the device and thereby aligning an indicator. Once the alignment is found to be satisfactory by the user (which the users needs to actively confirm), a transition to the tracking state is performed. In this state, the environment is being tracked, which allows for augmentations to be placed within the scene.
The instant tracking algorithm requires another input value to be provided in the initialization state. Specifically, the height of the tracking device above ground is required in order to accurately adjust the scale of augmentations within the scene. To this end, the example features a range input element that allows the height to be set in meters.
During the initialization, another parameter can be set which influences the alignment of the instant tracking ground plane. This ground plane is represented by the initialization indicator and can be rotated in order to start instant tracking at e.g. a wall instead of the floor.
Basic Instant Tracking
The Instant Tracking example provides a simple implementation of an application that allows users to place furniture in their environment.
Scene Setup
The scene consists mainly of the following parts:
WikitudeCamera: the standard prefab for theWikitudeCamerais used, with the exception that it is running in SD at 30 FPS. This is the recommended setup forInstant Tracking, as the algorithm is computationally intense and users might experience slowdowns on older devices.UI: the root of theUIwe will be using in this sample. SinceInstant Trackingworks in two distinct phases, theUIis also split in two, allowing to completely switch the interface. When theInstant Trackeris inInitializingmode, theUIonly displays a slider to control the height, as explained previously and a button to switch toTrackingmode. After the switch is done, theUIwill display a button for each furniture model that can be added to the scene. Each button has anOnBeginDragevent trigger on it that notifies the controller when a new furniture model needs to be added to the scene. The event trigger also has anintparameter, specifying which model should be created.Controller: container for multiple custom script components:InstantTrackerController: coordinates the activity between theInstant Tracker, theUI, the augmentations and the touch input.Gesture Controllers: react to touch input events and move or scale the augmentations accordingly.Grid Renderer: renders a grid with 25 cm spacing that can be helpful during initialization and tracking
Ground: a simple transparent plane with a custom shader that enables shadows on it. The plane also has a collider on it and can be used for physics interaction.Instant Tracker: the component that actually does all the tracking.
![]()
Instant Tracker Controller
The controller script coordinates all the other components of the scene. It contains references to all the UI elements and responds to events from them.
In the Awake function, the Application.targetFrameRate is set to 60. Even though the camera and tracking is running only at 30 FPS, having Unity running at a higher FPS allows for smoother user interaction.
When a drag is detected and the OnBeginDrag callback is called, we create a new model based on the index we receive and place it at the touch position, facing the camera.
// Select the correct prefab based on the modelIndex passed by the Event Trigger.
GameObject modelPrefab = Models[modelIndex];
// Instantiate that prefab into the scene and add it in our list of visible models.
Transform model = Instantiate(modelPrefab).transform;
_activeModels.Add(model.gameObject);
// Set model position by casting a ray from the touch position and finding where it intersects with the ground plane
var cameraRay = Camera.main.ScreenPointToRay(Input.mousePosition);
Plane p = new Plane(Vector3.up, Vector3.zero);
float enter;
if (p.Raycast(cameraRay, out enter)) {
    model.position = cameraRay.GetPoint(enter);
}

// Set model orientation to face toward the camera
Quaternion modelRotation = Quaternion.LookRotation(Vector3.ProjectOnPlane(-Camera.main.transform.forward, Vector3.up), Vector3.up);
model.rotation = modelRotation;
When the tracker loses the scene, which can happen when moving the device too fast, we make sure that all the models and the grid are hidden. Because the camera is not moved anymore when tracking is lost, the augmentations would appear to be frozen on the screen if they were not hidden. We also need to disable the furniture buttons, to prevent users from adding new objects.
While the SDK doesn't currently work in Edit Mode, you can still test the demo in the Editor by using Unity Remote. The SDK will also send most of the callbacks you expect in Edit Mode as well, allowing you to prototype gesture interaction without constantly building on a device.
![]()
Instant Scene Picking
The Scene Picking example shows how you can convert a touch position to a 3D position that maps to the environment. When using this API, users could for example place objects not only on the ground plane, but also on top of real world objects.
Scene Setup
The scene structure is similar to the one described in the Instant Tracking example, but has been simplified a bit. Specifically, the UI doesn't contain any furniture related controls, and there are no Gesture Controllers anymore.
Scene Picking Controller
The controller script is also much simpler than that of the Instant Tracking example. Its main concerns are listening for touch inputs, converting those inputs to 3D coordinates and placing an augmentation there. It is also responsible for the managing the state of the InstantTracker.
To convert input touch positions to 3D coordinates, the script calls the ConvertScreenCoordinate method on the InstantTracker, passing it the touch position as Unity provides it.
void Update() {
    if (_isTracking && Input.GetMouseButtonUp(0)) {
        Tracker.ConvertScreenCoordinate(Input.mousePosition);
    }
}
Because the conversion can take a long time, it is done on a separate thread and a callback event is provided in the InstantTracker to let you know when the results are available. The example script registers to this event in the Awake method.
void Awake() {
    Tracker.OnScreenConversionComputed.AddListener(OnScreenConversionComputed);
}
Finally, when the conversion was computed, it adds the augmentation to the specified location. It firsts needs to check if the conversion was successful, as it can fail if there is not enough information in the point cloud where the touch event happened. It adds the augmentation as a child of the _trackable, because the coordinates are in the local space of the InstantTrackable.
public void OnScreenConversionComputed(bool success, Vector2 screenCoordinate, Vector3 pointCloudCoordinate) {
    if (success) {
        var newAugmentation = GameObject.Instantiate(Augmentation, _trackable.transform) as GameObject;
        // The pointCloudCoordinate values are in the local space of the trackable.
        newAugmentation.transform.localPosition = pointCloudCoordinate;
        _augmentations.Add(newAugmentation);
    }
}
Persistent Instant Targets
The save and load instant targets feature allows for AR experiences to be persistently accessed by multiple users across devices and operating systems. Furthermore instant targets can be expanded on the fly. This section is concerned with showcasing this feature based on the corresponding samples of the sample application. This feature is not available with platform assisted tracking enabled.
The Save Instant Target and Load Instant Target samples shows how to use this feature in Unity.
Scene Setup
The scenes are similar to the one described in the Instant Tracking example, except that the Controller GameObject has an additional script attached, the SaveInstantTarget or LoadInstantTarget script, respectively.
Save Instant Target
To save an instant target, the InstantTracker.SaveCurrentInstantTracker method needs to be called while the InstantTracker is in tracking mode. The method accepts two Action parameters that will be called in case of success or failure. The directories of the provided path also needs to exist.
private void SaveTarget() {
    var path = Application.persistentDataPath + "/InstantTarget.wto";
    Tracker.SaveCurrentInstantTarget(path, SaveSuccessHandler, SaveErrorHandler);
    InfoMessage.text = "Saving instant target to: " + path;
}

private void SaveSuccessHandler(string path) {
    /* Handle success */
}

private void SaveErrorHandler(Error error) {
    /* Handle errors */
}
The handlers can also be implemented with lambda functions.
Load Instant Target
To load an instant target, the InstantTracker.LoadInstantTarget method needs to be called with the path to a previously saved instant target. Similar to SaveCurrentInstantTracker, this method also accepts two Action parameters that will be called in case of success or failure. Additionally, an expansion policy can be set through the InstantTargetRestorationConfiguration. This controls whether the instant target should be further expanded or not.
private void LoadTarget() {
    // A TargetCollectionResource is needed to manage file loading.
    var targetCollectionResource = new TargetCollectionResource();
    // UseCustomURL is used to specify that the file is not inside the "StreamingAssets" folder
    targetCollectionResource.UseCustomURL = true;
    // The "file://" is used to indicate that the file is located on disk, and not on a server.
    targetCollectionResource.TargetPath = "file://" + Application.persistentDataPath + "/InstantTarget.wto";
    var configuration = new InstantTargetRestorationConfiguration();
    // Indicate that we allow the target to be expanded after it was loaded.
    configuration.ExpansionPolicy = InstantTargetExpansionPolicy.Allow;
    Tracker.LoadInstantTarget(targetCollectionResource, configuration, LoadSuccessHandler, LoadErrorHandler);
}
After the instant target is loaded the tracker will immediately try to find and track it.
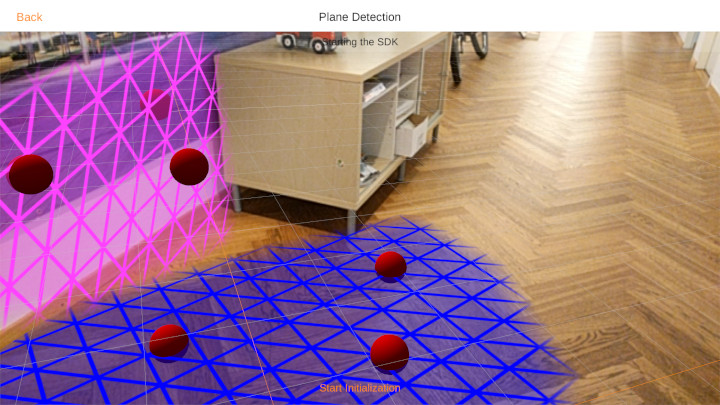
Plane Detection - Experimental
Once Plane detection is enabled, the Wikitude SDK will search for planar surfaces in the representation of the scene (the point cloud). Sufficient and accurate information will then produce planar surfaces, that developers can use to interact with the actual scene. Hit testing will use found planes for a better estimate of depth values in the scene. The algorithm can detect different types of planes
Horizontal Up(e.g. floor, carpet, table)Horizontal Down(e.g. ceiling)Vertical(walls,...)Arbitrary(ramps, staircases,...)
Developers can choose which type of planes they are interested in and filter correspondingly.
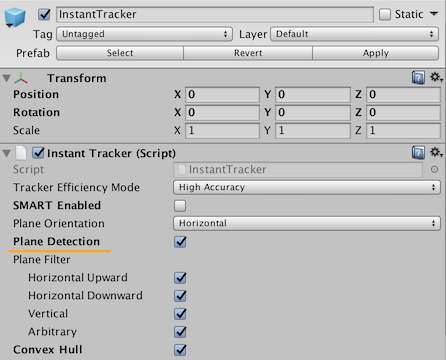
To enable plane detection for an InstantTracker, the Plane Detection option needs to be enabled in the Instant Tracker inspector, or through the C# API.
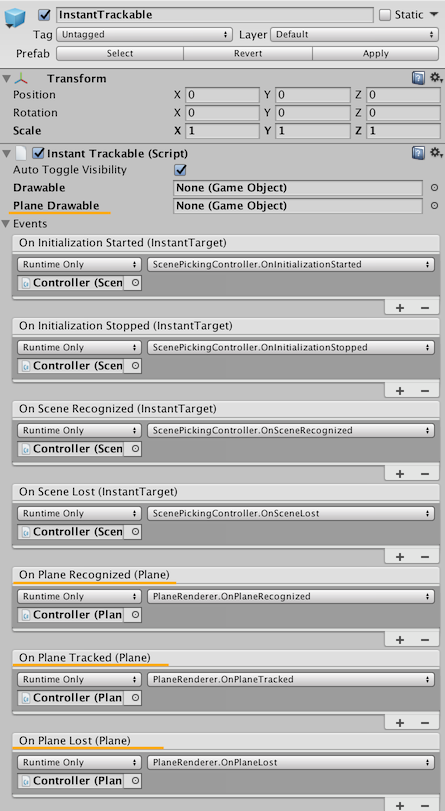
Once this is enabled, augmentations can be drawn using two methods:
- Attaching a prefab to the
Plane Drawableproperty in theInstant Trackableinspector. This will instantiate the prefab whenever a new plane is detected and attach it to the plane. When the plane is lost, the instantiation will be destroyed. - Subscribing to the
On Plane Recognized,On Plane TrackedandOn Plane Lostin theInstant Trackableinspector. This will allow you to react to plane detection events in a custom way, as well as providing additional information about the plane, such as extents and convex hull.
Here is an example of how to handle the three plane callbacks. Please not that some error validation and mesh generation have been omitted from this example. Please see the full example code in the PlaneRenderer.cs script.
public void OnPlaneRecognized(Wikitude.Plane recognizedPlane) {
    // Create a new augmentation.
    var renderPlane = new GameObject("Plane");
    // Attach the augmentation to the plane.
    renderPlane.transform.SetParent(recognizedPlane.Drawable.transform);

    // Create a new mesh to represent the recognized plane.
    var mesh = new Mesh();
    renderPlane.AddComponent<MeshFilter>().mesh = mesh;
    renderPlane.AddComponent<MeshRenderer>().material = new Material(RenderPlaneMaterial);

    // Update the augmentation with data from the plane.
    UpdateMesh(renderPlane, mesh, recognizedPlane);

    // Keep track of currently recognized planes so that their corresponding augmentations can be updated.
    _renderPlanes.Add(recognizedPlane.ID, renderPlane);
}
public void OnPlaneTracked(Wikitude.Plane trackedPlane) {
    // Find the corresponding augmentation for the plane that is being updated.
    GameObject renderPlane;
    if (_renderPlanes.TryGetValue(trackedPlane.ID, out renderPlane)) {
        // Update the augmentation with new data from the plane.
        UpdateMesh(renderPlane, renderPlane.GetComponent<MeshFilter>().sharedMesh, trackedPlane);
    }
}
public void OnPlaneLost(Wikitude.Plane lostPlane) {
    // Find the corresponding augmentation for the plane that was lost.
    GameObject renderPlane;
    if (_renderPlanes.TryGetValue(lostPlane.ID, out renderPlane)) {
        // Destroy the associated augmentation and remove the reference to it.
        _renderPlanes.Remove(lostPlane.ID);
        Destroy(renderPlane);
    }
}
When configuring Plane Detection, the Instant Tracker offers two more options:
Plane Filter: This option allows you to select which type of plane should be detected, and which ones should be ignored. The type of a recognized plane can be found through theWikitude.Plane.PlaneTypeproperty. Filtering out undesired planes types can improve performance as well, since fewer planes need to be processed.Convex Hull: This option enables the computation of the convex hull of a plane. The convex hull can be access through theWikitude.Plane.ConvexHullproperty as afloat[], where every two values represent the X and Z values of a point relative to the plane, which can be rendered as a triangle fan. If the convex hull is not needed, it's best to disable this option, to avoid unnecessary processing.
When calling ConvertScreenCoordinate on the InstantTracker, any planes that were detected will be taken into consideration automatically.