Calibration
The Wikitude SDK includes a calibration mechanism, so that each device can be calibrated to the users needs. On one hand each device itself has small variations in how the camera is placed on the other each user has a different way how to look through the device. For that the Wikitude SDK includes a simple process to calibrate each device (1:1 calibration feature). The calibration is simple and uses computer-vision algorithm to identify the best possible calibration. The profile can be stored permanently on the device. This guide shows you how the calibration process works and how to customize the entire process in case you want to include the calibration into your own app and align it with your CI/CD.
Calibration Process
During the first start of an augmented reality experience on a smart glass device the Wikitude SDK is checking to see if a calibration profile is already present on the device. If it detects a calibration profile it is immediately used. Otherwise the calibration process is being started where the user is asked if they want to calibrate their device and then guided through the process.
The calibration process is divided into five steps:
- Calibrate left eye at a close distance
- Calibrate right eye at close distance
- Calibrate left eye at far distance
- Calibrate right eye at far distance
- Verify the calibration result
Prerequisites
- Printed Target Image: You need to print the calibration image with scale 100% use the version for A4 (PDF A4) or US-letter (PDF US-letter) format. This is important, otherwise calibration results will be wrong. Make sure the height of the printed image then is 189mm/7.44 inch.
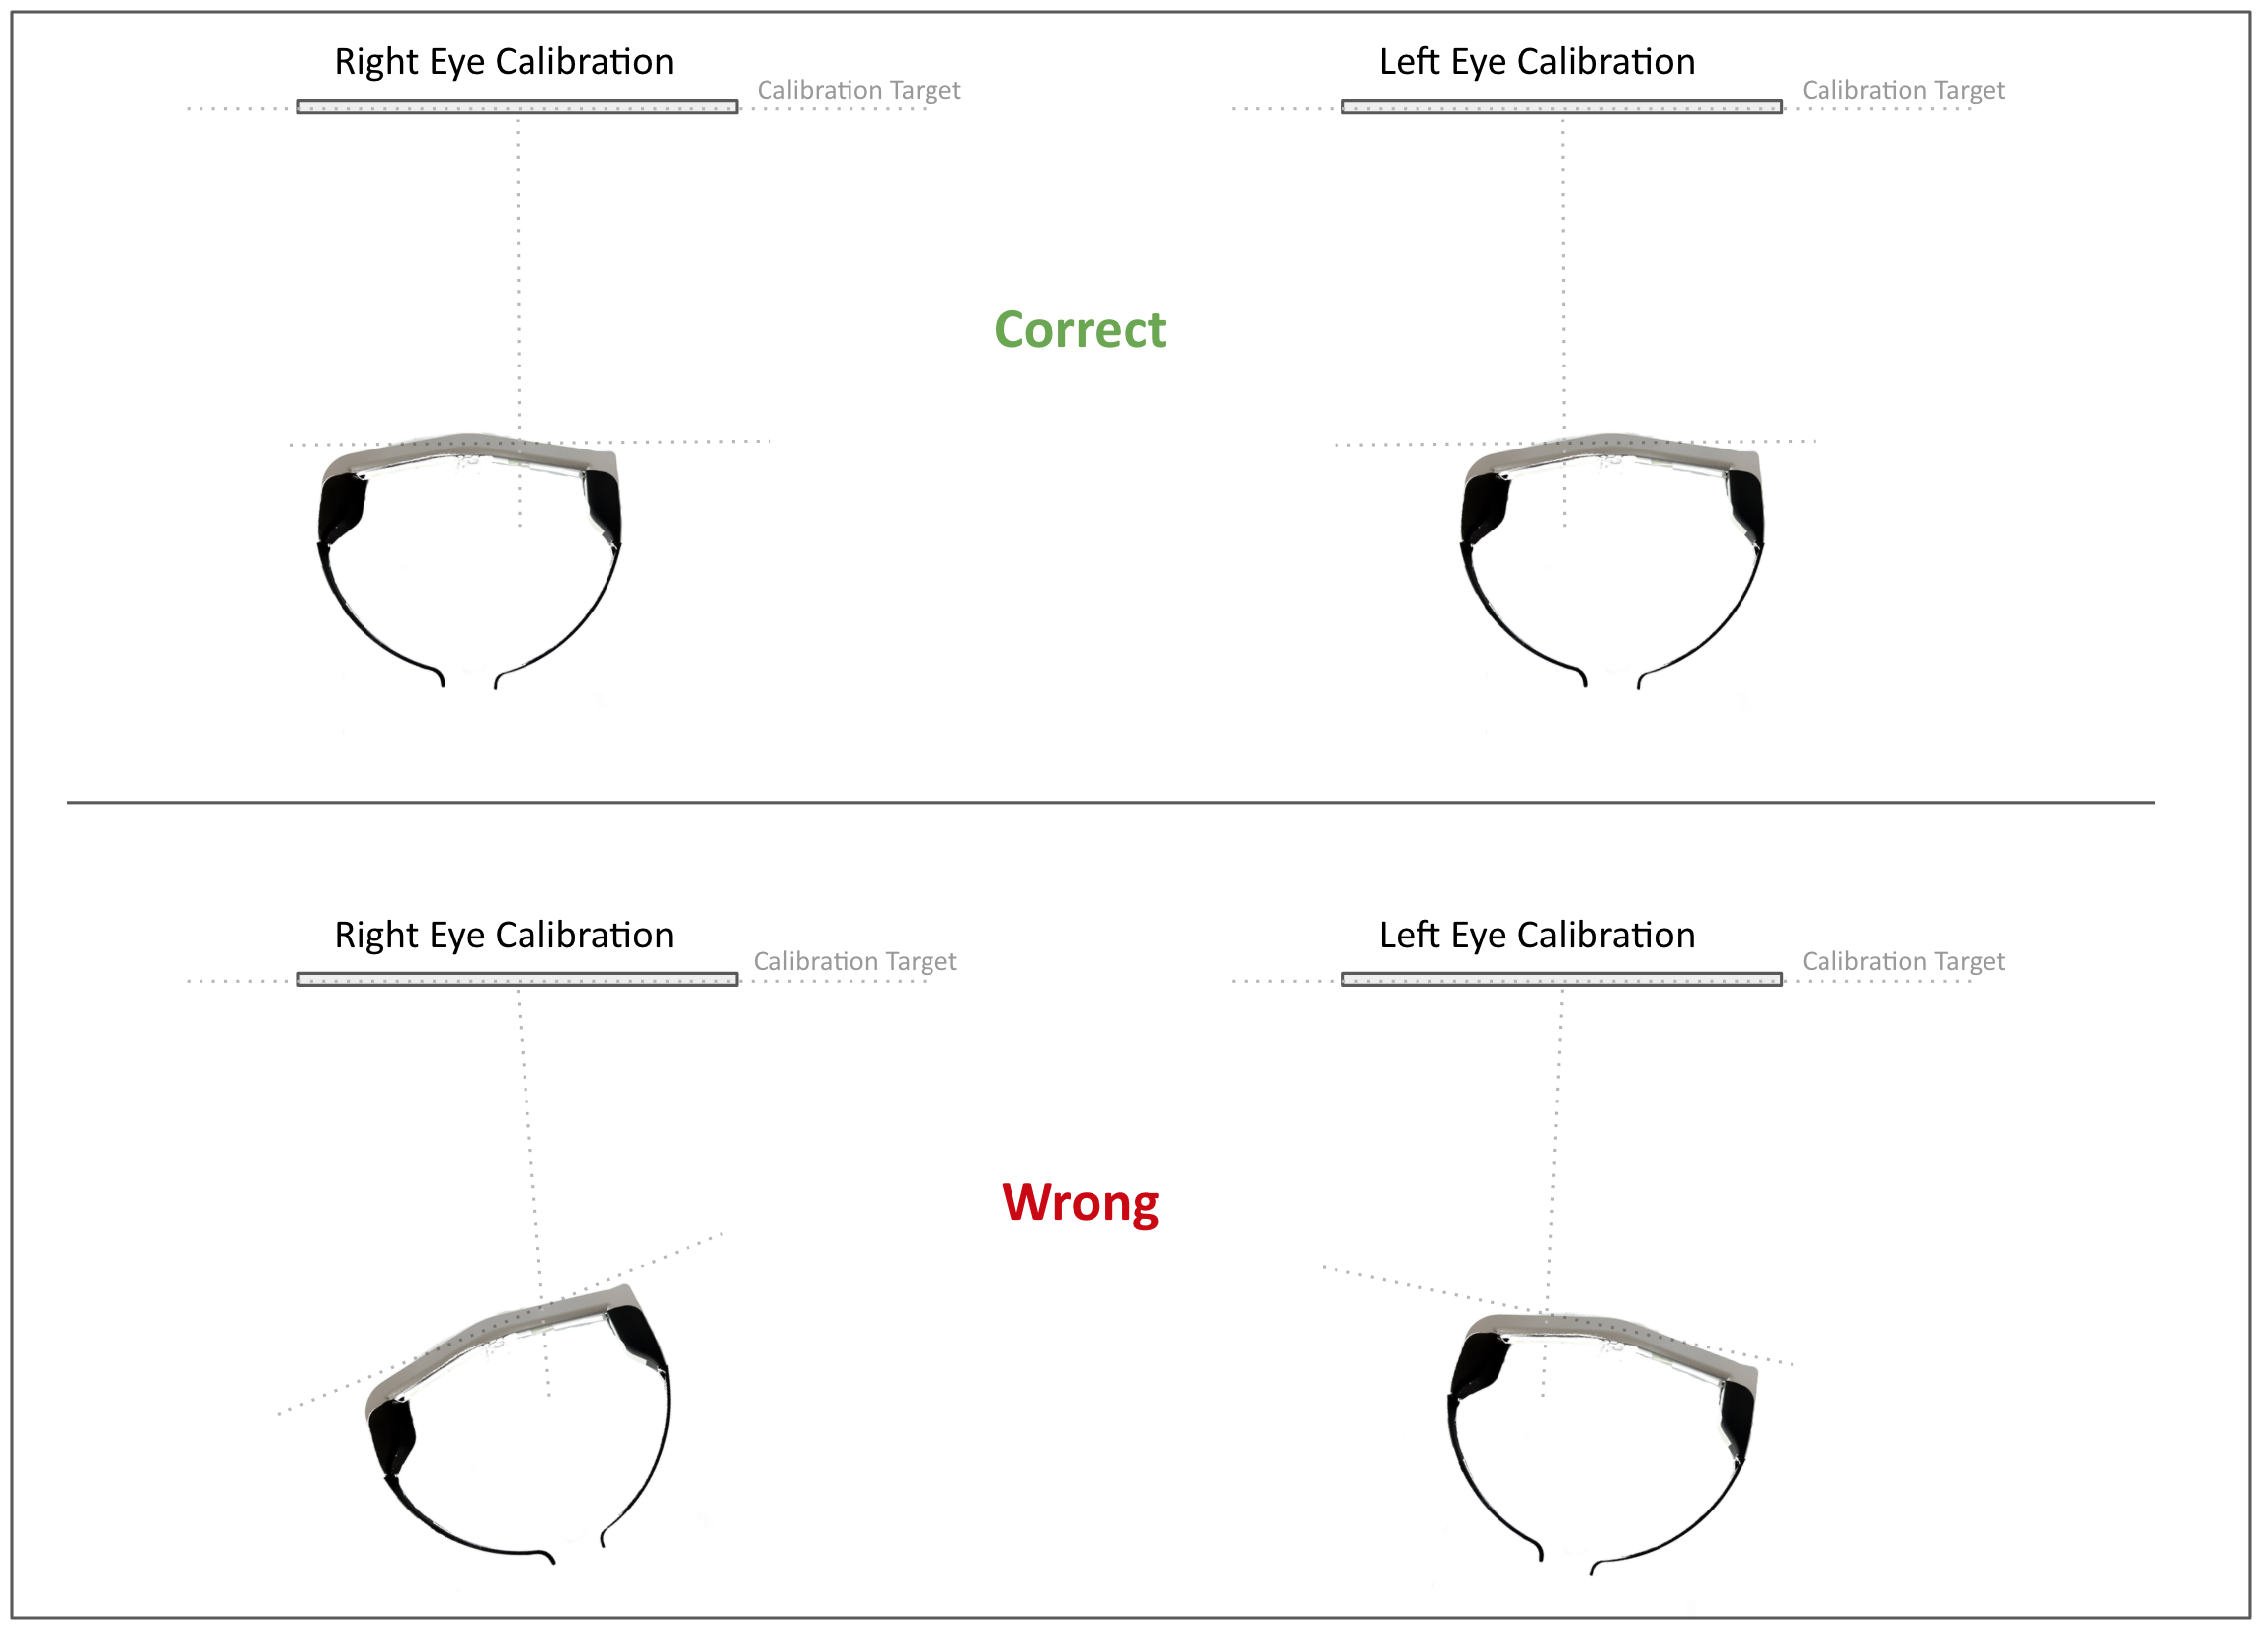
- To ensure a good result, place the printed calibration target on a wall in a well lit room where the center of the target image is at about the same height as your eyes.
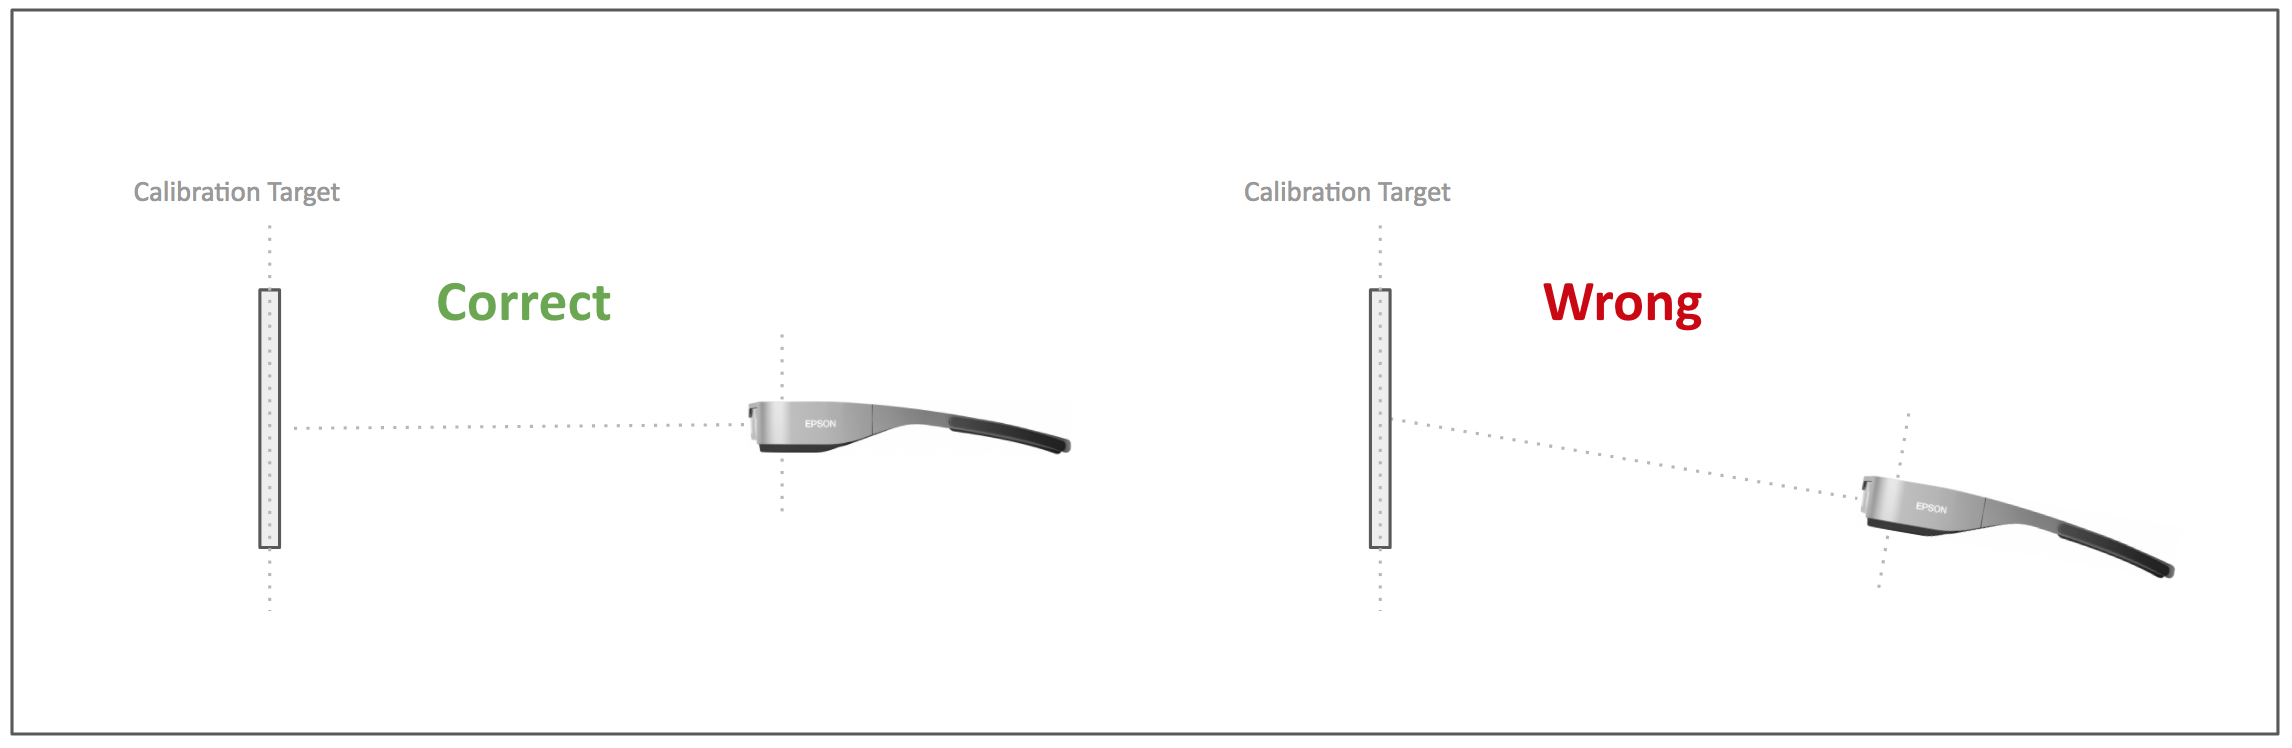
- Make sure to look straight onto the calibration target and not rotate your head when switching eyes, but rather move side-ways as depicted in the image below.
Steps 1-4
The only difference between these steps is the eye used for the calibration and the size of the calibration box (and with that the distance to the calibration image). This instruction applies for all 4 steps
Step 1-4 can be divided into the following sub-steps again:
- Read the instructions shown on the display.
- Close the eye mentioned in the description and align the box on the display with the printed calibration target.
- Ensure that the box is green which means the calibration target is recognized. If the box is red try to move closer to the image and once it is green try to align it again.
- When the box is green and aligned click somewhere and wait for 1.5 seconds. You can see a progress bar on top of the screen indicating that the calibration is running. While this is happening try to move as little as possible and keep the box aligned.
- After completing this step instructions for the next step are shown.
![]()
![]()
Step 5
After aligning the box four times a rectangle is drawn around the calibration target to validate the calibration profile. Check whether the alignment is good and continue to save the profile. In case you are not satisfied with the result you can re-start the calibration process.

Customisation
There are many ways in which the calibration can be customized to your own needs. To sum it up:
- Calibration storage path
- Calibration experience
- Target image
- Distance between near and far calibration
- Order of the eyes during calibration
- Time for calibrating each eye
- Verification augmentation
- Reset calibration
Calibration storage path
The calibration profile is stored in the file external-storage/Wikitude/calibration.js by default. The Wikitude SDK is searching this path by default, which has the benefit that other apps based on the Wikitude SDK can use this profile.
If this path is changed this is not possible any more so it is recommended to use the default calibration storage path by just calling architectView.onPostCreate(). To change it use architectView.onPostCreate('path to calibration') in the onPostCreate method of the Activity.
Calibration experience
To customize the calibration you need to create your own AR experience. For a custom calibration experience you first need a AR.CalibrationTracker and a AR.ImageTrackable. An image drawable is used for the last verification step.
this.resource = new AR.TargetCollectionResource("assets/calibration.wtc")
this.calibrationTracker = new AR.CalibrationTracker(resource);
var i = new AR.ImageResource("assets/verification.png");
var id = new AR.ImageDrawable(i, 1, {
    enabled: false
});

this.imageDrawable = id;

var obj = new AR.ImageTrackable(this.calibrationTracker, "*", {
    drawables: {
        cam: [this.imageDrawable]
    },
    onImageLost: this.calibrationDisallowed,
    onImageRecognized: this.calibrationAllowed
});
The methods onImageLost and onImageRecognized are used to determine if the target image is tracked and that the calibration can take place.
calibrationAllowed: function() {
    this.isAllowed = true;
},
calibrationDisallowed: function() {
    this.isAllowed = false;
    this.lostTracking = true;
},
The layout of the calibration box can be chosen as you like it but it has to have an aspect ratio of 4:3.
It has to be shown large and small for each eye. In the default experience the calibration box is a simple div element with a red and green border.
When the user aligned the box and confirmed it calibrationTracker.calibrateGlasses('current eye', 'calibration box height') needs to be called.
current eye has to be one of the following:
calibrationTracker.Step.LEFT_NEARcalibrationTracker.Step.LEFT_FARcalibrationTracker.Step.RIGHT_NEARcalibrationTracker.Step.RIGHT_FAR
After a defined amount of time, in the default calibration experience 1.5 seconds, calibrationTracker.stopCalibration() needs to be called to end the calibration for the current eye.
if (this.isAllowed == true) {
    this.calibrationTracker.calibrateGlasses('current eye', 'calibration box height')

    setTimeout(function() {
        if (this.lostTracking == true) {
            // Handle loss of tracking
        } else {
            this.calibrationTracker.stopCalibration()
            //call next step
        }
    }, 'time to calibrate in milliseconds');
}
When the calibration steps for near and far are done for both eyes calibrationTracker.finishCalibration() has to be called and the AR.ImageDrawable should be shown for the verification.
this.calibrationTracker.finishCalibration();
this.imageDrawable.enabled = true;
If the user decides that the calibration is good you need to call calibrationTracker.exitCalibration() which loads the experience and saves the calibration. To redo the calibration you just need to do the steps described above again.
Now that you have your calibration experience you need to inform the Wikitude SDK about its location. You can do this by calling architectView.setCalibrationWorldLocation('path to calibration experience') before architectView.onPostCreate().
Target image
The target image is defined in the .wtc file included in the experience. To create a new .wtc file you can use Wikitude Studio (Read more about how Target Management works in general). To use your own calibration image you need to include it inside your calibration experience and call:
this.calibrationTracker = new AR.CalibrationTracker('your TargetCollectionResource or CloudRecognitionService', {
        physicalTargetImageHeights: {
            'your target image name': 'target image height in mm'
        }
    }
);
If you change the target image you have to make sure that the image has an aspect ratio of 4:3 and that the physical height is set correctly in the calibrationTracker. If you omit the height, the calibration will not provide any meaningful results.
Distance between near and far calibration
The distance between near and far calibration can be set by the size of the calibration boxes. The larger the difference between the two boxes is the larger is the distance between near and far calibration.
Order of the eyes during calibration
As mentioned above you can control the order of the calibration steps by calling calibrationTracker.calibrateGlasses('current eye', 'calibration box height') four times in any order you wish.
Time for calibrating each eye
The calibration time for each eye can be set however you like it as it is the time difference between the call to calibrationTracker.calibrateGlasses('current eye', 'calibration box height') and the call to calibrationTracker.stopCalibration()
Verification augmentation
The verification augmentation can be set by creating a new AR.ImageResource and AR.ImageDrawable based on your image and adding it to the AR.ImageTrackable.
var i = new AR.ImageResource('path to custom augmentation');
var id = new AR.ImageDrawable(i, 1, {
    enabled: false
});

var obj = new AR.ImageTrackable(this.calibrationTracker, "*", {
    drawables: {
        cam: id
    },
});
Reset calibration
To reset the calibration you can delete the file at external-storage/Wikitude/calibration.js or your custom location.
You can also call architectView.resetCalibration() which returns if the reset was successful.