Plugins API
The Plugins API provides access to the camera frame as a native pointer. This allows you to do additional processing on it, either in C#, or in native code (C++, Objective C, Java). This guide is split into two parts. First, we will discuss how to enable and use plugins in your Unity project. In the second part, we'll go through the steps required to build and use a native library.
Unity interface
To enable plugins, you need to add the PluginManager script to a GameObject. Then, you simply subscribe to the On Camera Frame Available event and you will be notified when a new camera frame is ready for additional processing.

You will receive as a parameter to the callback a Wikitude.Frame struct which contains the native pointer to the raw data, as well as additional information about the frame.
public struct Frame
{
    public IntPtr Data;
    public int DataSize;
    public int Width;
    public int Height;
    public FrameColorSpace ColorSpace;
}
The ColorSpace field provides information about the format of the frame you are receiving.
public enum FrameColorSpace : int {
    /// <summary>
    /// Represents a color space where image data is given in a YUV 420 format, arranged to be compliant to the NV21 standard.
    //  The data size is frame width * frame height * 3/2, meaning full luminance resolution and half the size for chroma red * chroma blue
    //
    //  On iOS this is represented by the kCVPixelFormatType_420YpCbCr8BiPlanarFullRange constant
    //  On Android this is represented by the ImageFormat.YUV_420_888 constant. After that the frame needs to be converted to the NV21 format (replace U and V)
    /// </summary>
    YUV_420_NV21 = 0,

    /// <summary>
    /// Represents a color space where image data is given in a RGB format.
    /// The data size is frame width * frame height * 3 (R, G and B channel).
    ///
    /// On iOS this is represented by the kCVPixelFormatType_24RGB constant
    /// On Android this is represented by the ImageFormat.FLEX_RGB_888 constant
    /// </summary>
    RGB
}
The native pointer is only valid during the duration of the current update and you should never delete or change the data it's pointing to. You can pass this pointer to your own native plugins, or transfer the data in C# using Marshal.Copy functions.
using UnityEngine;
using System;
using Wikitude;
using System.Runtime.InteropServices;

public class PluginController : MonoBehaviour
{
    public void OnCameraFrameAvailable(Frame frame) {

        // Example of how to transfer data from native memory
        // to a C# array

        byte[] data = new byte[frame.DataSize];
        Marshal.Copy(frame.Data, data, 0, frame.DataSize);
    }
}
Sample explanation
The Plugins - Barcode sample shows how to integrate the popular barcode library ZBar into Unity and use the Plugins API to send camera frames to it for processing.
ZBar is an open source software suite for reading bar codes from various sources, such as video streams, image files and raw intensity sensors. It supports many popular symbologies (types of bar codes) including EAN-13/UPC-A, UPC-E, EAN-8, Code 128, Code 39, Interleaved 2 of 5 and QR Code.
The BarcodePlugin.cs script manages the native C++ library, forwards calls to it and returns scanning results. First, the script declares the functions available in the native C++ library, so that they are available in C#
[DllImport("barcode")]
private static extern void initialize(int width, int height);

[DllImport("barcode")]
private static extern string get_barcode(int width, int height, IntPtr buffer);

[DllImport("barcode")]
private static extern void destroy();
After that, it provides C# methods that simply forward the call to C++ and return any result directly.
public void Initialize(int width, int height) {
    initialize(width, height);
}

public string GetBarcode(Wikitude.Frame frame) {
    return get_barcode(frame.Width, frame.Height, frame.Data);
}

public void Destroy() {
    destroy();
}
The PluginController.cs script controls the sample. It is registered in the editor to receive OnCameraFrameAvailable. First, initializes the barcode scanner when the first frame is received, then forwards the pointer to the data to the scanner and prints the result it receives from it.
public void OnCameraFrameAvailable(Frame frame) {
    if (!_initialized) {
        _plugin.Initialize(frame.Width, frame.Height);
        _initialized = true;
    }

    string barcode = _plugin.GetBarcode(frame);

    if (barcode != null) {
        ResultText.text = barcode;
    } else {
        ResultText.text = "Could not detect any barcodes";
    }
}
Native code
In the project you will also find source code for the barcode plugin. It is contained in a single .cpp file named barcode.cpp in Assets/Wikitude/Samples/NativeCode/BarcodePlugin/src.
#include <stdlib.h>
#include <string.h>
#include "zbar.h"

zbar::Image* _image;
zbar::ImageScanner* _imageScanner;

extern "C" {
    void initialize(int width, int height);
    const char* get_barcode(int width, int height, unsigned char* data);
    void destroy();
}

void initialize(int width, int height)
{
    _image = new zbar::Image(width, height, "Y800", nullptr, 0);
    _imageScanner = new zbar::ImageScanner();
    _imageScanner->set_config(zbar::ZBAR_NONE, zbar::ZBAR_CFG_ENABLE, 1);
}

const char* get_barcode(int width, int height, unsigned char* data)
{
    _image->set_data(data, width * height);
    int n = _imageScanner->scan(*_image);

    if (n)
    {
        zbar::Image::SymbolIterator symbol = _image->symbol_begin();
        return strdup(symbol->get_data().c_str());
    }
    else
    {
        return nullptr;
    }
}

void destroy()
{
    _image->set_data(nullptr, 0);

    delete _image;
    delete _imageScanner;
}
All the exported functions need to be declared with "C" linkage so that they can be linked with the C# code.
Rebuilding for Android
If you need to rebuild the plugin, you can use the included .mk files for Android located in the Assets/Wikitude/Samples/NativeCode/BarcodePlugin/project/android/ folder. After the build is done, copy the resulting .so file in the Assets/Wikitude/Samples/Plugins/Android/ folder, overwriting the current one.
Please check the Android documentation for how to build mk files using ndk-build.
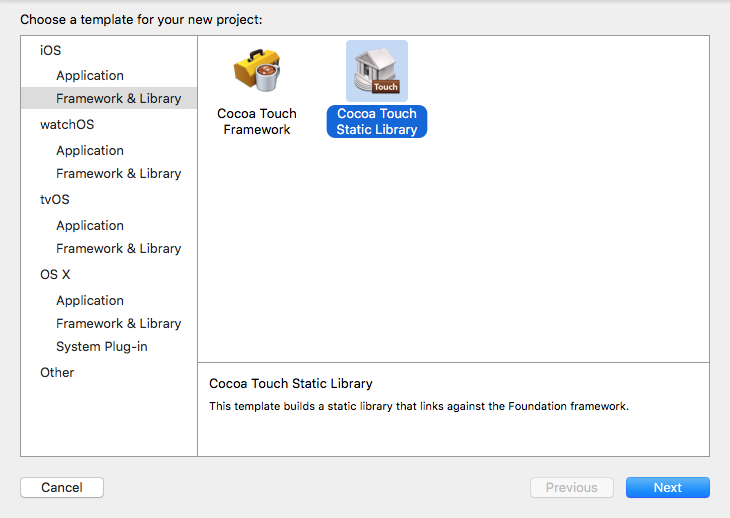
Rebuilding for iOS
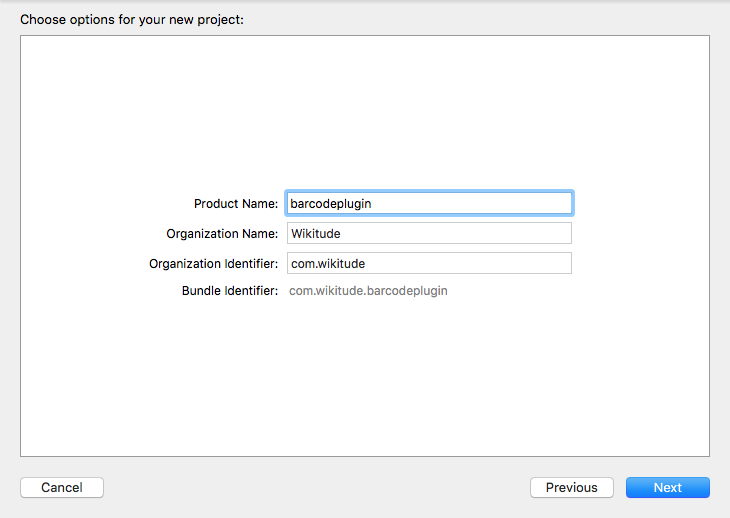
For iOS, you will need to create a new library project and name it barcodeplugin.
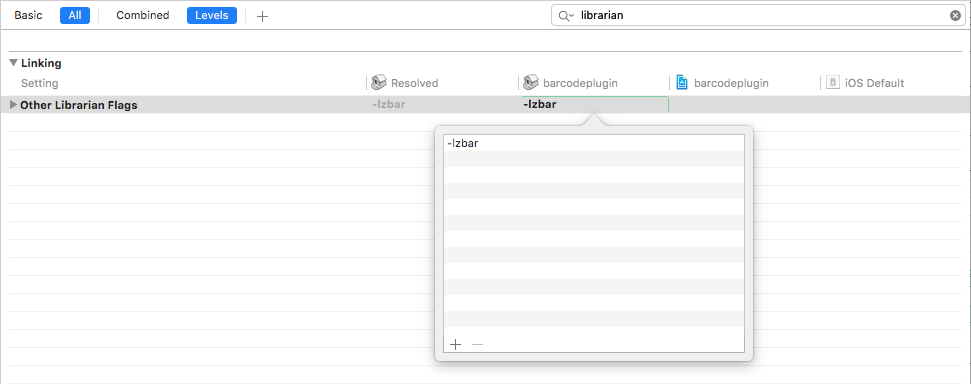
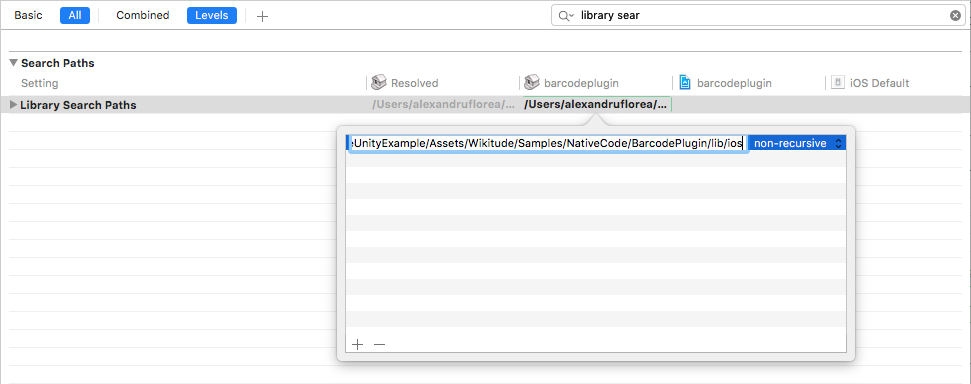
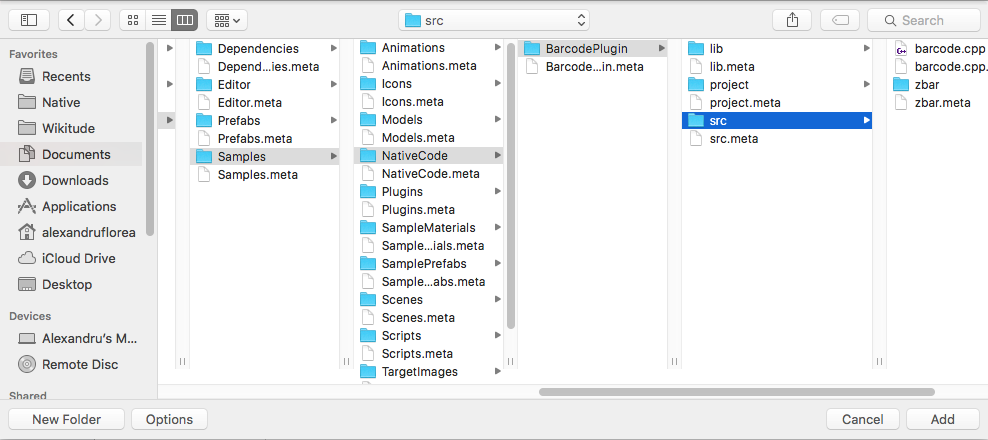
In the Build Settings tab, set Other Librarian Flags to -lzbar and the Library Search Paths to include the path where the libzbar.a libary for iOS is located. You can find it in Assets/Wikitude/Samples/NativeCode/BarcodePlugin/lib/ios.
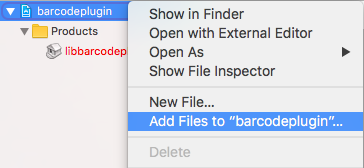
Then, you need to include the Assets/Wikitude/Samples/NativeCode/BarcodePlugin/src folder into the project.
Finally, the library needs to be build for Generic iOS Device.

After it is done, you can copy the product libbarcodeplugin.a in the Assets/Wikitude/Samples/Plugins/iOS/ folder, overwriting the current one.