Instant Tracking
The following sections detail the instant tracking feature of the Wikitude Native SDK by introducing a minimal implementation, showcasing the simplicity the Wikitude Native SDK provides.
Introduction
Instant tracking is an algorithm that, contrary to those previously introduced in the Wikitude SDK, does not aim to recognize a predefined target and start the tracking procedure thereafter, but immediately start tracking in an arbitrary environment. This enables very specific use cases to be implemented.
The algorithm works in two distinct states; the first of which is the initialization state. In this state the user is required to define the origin of the tracking procedure by simply pointing the device and thereby aligning an indicator. Once the alignment is found to be satisfactory by the user (which the users needs to actively confirm), a transition to the tracking state is performed. In this state, the environment is being tracked, which allows for augmentations to be placed within the scene.
![]() The instant tracking algorithm requires another input value to be provided in the initialization state. Specifically, the height of the tracking device above ground is required in order to accurately adjust the scale of augmentations within the scene. To this end, the example features a range input element that allows the height to be set in meters.
The instant tracking algorithm requires another input value to be provided in the initialization state. Specifically, the height of the tracking device above ground is required in order to accurately adjust the scale of augmentations within the scene. To this end, the example features a range input element that allows the height to be set in meters.
During the initialization, another parameter can be set which influences the alignment of the instant tracking ground plane. This ground plane is represented by the initialization indicator and can be rotated in order to start instant tracking at e.g. a wall instead of the floor.
Please refer to the InstantTrackerConfiguration reference for detailed information.
Basic Instant Tracking
The Instant Tracking example provides a minimal implementation of the instant tracking algorithm. First make sure we import the packages below.
import com.wikitude.tracker.InstantTracker;
import com.wikitude.tracker.InstantTrackerListener;
import com.wikitude.tracker.InstantTarget;
import com.wikitude.tracker.InitializationPose;
import com.wikitude.tracker.InstantTrackingState;
Next we have to make some additions to our Activity. In order to use instant tracking, the Activity has to implement the InstantTrackerListener and we will need an InstantTracker and two instances of InstantTrackingState as members.
public class InstantTrackingActivity extends Activity implements InstantTrackerListener, ExternalRendering {
private InstantTracker mInstantTracker;

private InstantTrackingState mCurrentTrackingState = InstantTrackingState.Initializing;
private InstantTrackingState mRequestedTrackingState = InstantTrackingState.Initializing;
Initializing the InstantTracker is fairly straightforward. Just run this line in the initialization phase of the Activity.
mInstantTracker = mWikitudeSDK.getTrackerManager().createInstantTracker(this, null);
An InstantTracker can, minimally, be instantiated with just the line above, although supplying drawables to be rendered in both the initialization state and the tracking state is advisable for any practical use case. Therefore a CustomSurfaceView instance is generated and supplied as well.
@Override
public void onRenderExtensionCreated(final RenderExtension renderExtension_) {
    mGLRenderer = new GLRenderer(renderExtension_);
    mSurfaceView = new CustomSurfaceView(getApplicationContext(), mGLRenderer);
    mDriver = new Driver(mSurfaceView, 30);
    setContentView(mSurfaceView);

    FrameLayout viewHolder = new FrameLayout(getApplicationContext());
    setContentView(viewHolder);

    viewHolder.addView(mSurfaceView);
To use our CustomSurfaceView for the initialization of InstantTracker, implement the onInitializationPoseChanged callback function of the InstantTrackerListener.
@Override
public void onInitializationPoseChanged(InstantTracker tracker, InitializationPose pose) {
    mGLRenderer.setCurrentlyRecognizedTarget(pose);
}
This callback function supplies an InstantTracker and the current InitializationPose, the latter of which can be used to set the renderer to the currently recognized target so the CustomSurfaceView is displayed properly during the initialization state.
We have to make sure that we always know in which state the instant tracker currently is. In order to assure this, we update mCurrentTrackingState in every call of onStateChanged.
@Override
public void onStateChanged(InstantTracker tracker, InstantTrackingState state) {
    mCurrentTrackingState = state;
}
Next we need a means to transition from one state to the other. For this task we provide a button, which toggles the current tracking state. mRequestedTrackingState is used here to ensure that the toggle between the two states works correctly.
final Button changeStateButton = (Button) findViewById(R.id.on_change_tracker_state);
changeStateButton.setOnClickListener(new View.OnClickListener() {
    @Override
    public void onClick(final View view) {
        if (mRequestedTrackingState == InstantTrackingState.Initializing) {
            if (mCurrentTrackingState == InstantTrackingState.Initializing) {
                mRequestedTrackingState = InstantTrackingState.Tracking;
                mInstantTracker.setState(mRequestedTrackingState);
                changeStateButton.setText(R.string.instant_tracking_button_start_initialization);
            }
        } else {
            if (mCurrentTrackingState == InstantTrackingState.Tracking) {
                mRequestedTrackingState = InstantTrackingState.Initializing;
                mInstantTracker.setState(mRequestedTrackingState);
                changeStateButton.setText(R.string.instant_tracking_button_start_tracking);
            }
        }
    }
});
Now we can switch between the two states, so we need to update position of the rectangle once the tracking state is active, which we do in the onTracked callback function.
@Override
public void onTracked(InstantTracker tracker, InstantTarget target) {
    mGLRenderer.setCurrentlyRecognizedTarget(target);
}
Lastly, we provide a SeekBar to set the deviceHeight property of the InstantTracker. While this change is, strictly speaking, not required, we strongly recommend every application to supply the device height accurately by this method or another for the Wikitude SDK to provide an accurate scale.
final SeekBar heightSlider = (SeekBar) findViewById(R.id.heightSeekBar);
heightSlider.setMax(190);
heightSlider.setProgress(90);
heightSlider.setOnSeekBarChangeListener(new SeekBar.OnSeekBarChangeListener() {
    @Override
    public void onProgressChanged(SeekBar seekBar, int progress, boolean fromUser) {
        float height = (progress + 10) / 100.f;
        mInstantTracker.setDeviceHeightAboveGround(height);
        heightBox.setText(String.format( "%.2f", height ));
    }

    @Override
    public void onStartTrackingTouch(SeekBar seekBar) {

    }

    @Override
    public void onStopTrackingTouch(SeekBar seekBar) {

    }
});
The example outlined in this section renders an orange rectangle augmentation when in initialization state which then stays on its originally assigned position when in tracking state. While the example is quite trivial, we believe it serves the purpose of familiarizing the reader with the core concepts of instant tracking well.
Instant Scene Picking
The instant tracking feature further allows for 3D points to be queried from the underlying point cloud structure. This section is concerned with showcasing this feature based on the corresponding sample of the sample application.
To utilize this feature a 2D input position on the screen is required. The OnTouchListener of the GLSurfaceView is set for that purpose.
this.mSurfaceView.setOnTouchListener(new View.OnTouchListener() {
    @Override
    public boolean onTouch(View v, MotionEvent event) {
        [...]
    }
});
The onTouch function is implemented to query the touch position and pass these coordinates to the convertScreenCoordinateToPointCloudCoordinate function. These input coordinates have their origin in the top-left corner of the screen and are within the interval [0, screen_width_in_pixels) and [0, screen_height_in_pixels). Within the completion handler function, a boolean value and a 3D point is received. The former informs on whether the operation completed successfully or not; the latter contains the result in case of success, null in case of failure. Note that the query will fail whenever no point cloud position can be found for the input coordinate within a specific interval. For successful queries a StrokedCube instance is generated and placed at the resulting position as an augmentation.
this.mSurfaceView.setOnTouchListener(new View.OnTouchListener() {
    @Override
    public boolean onTouch(View v, MotionEvent event) {
        if (event.getAction() == MotionEvent.ACTION_DOWN) {

            Point2D<Float> screenCoordinates = new Point2D<>();
            screenCoordinates.setX(event.getX());
            screenCoordinates.setY(event.getY());

            mInstantTracker.convertScreenCoordinateToPointCloudCoordinate(screenCoordinates, new InstantTrackerScenePickingCallback() {
                @Override
                public void onCompletion(boolean success, Point3D result) {
                    if (success) {
                        StrokedCube strokedCube = new StrokedCube();
                        strokedCube.setXScale(0.05f);
                        strokedCube.setYScale(0.05f);
                        strokedCube.setZScale(0.05f);
                        strokedCube.setXTranslate(result.getX());
                        strokedCube.setYTranslate(result.getY());
                        strokedCube.setZTranslate(result.getZ());
                        mGLRenderer.setRenderablesForKey("" + cubeID++, strokedCube, null);
                    }
                }
            });
        }

        return true;
    }
});
Finally, running the sample allows cube augmentations to be placed on screen touch when in tracking state.
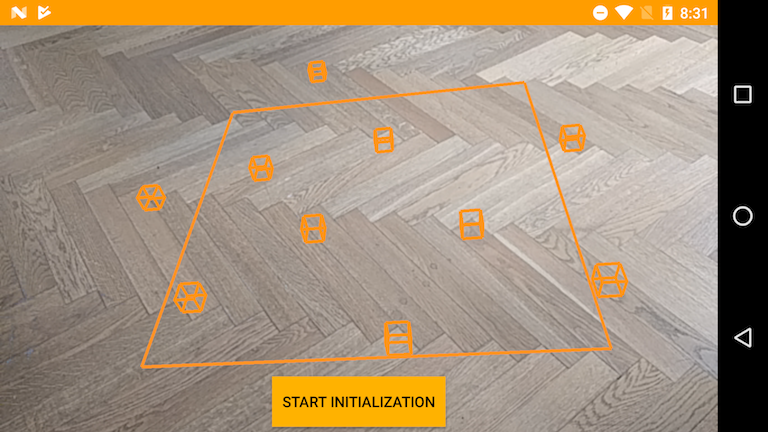
instant scene picking on the floor of the Wikitude offices